Hitchhiker's Guide to eCommerce PPC - Part 4
Welcome back! That is, if you’ve been following along and have already read Modules 1, 2, and 3. As in Modules One, Two and Three, we will be
covering a lot ground. You can either go
back and read Modules One, Two and Three, or if you’re a renegade…just start reading
in the middle! However, I definitely
don’t suggest it, we learned a lot in those other modules and I’d hate for you
to miss out or get confused.
We have been laser beam focused on AdWords search campaigns so far. Now, we’re going to get out of comfort zone, and start using some other forms of traffic that may even be
more profitable.
Here is what we will cover in Part 4:
I. Google Shopping and Product Listing Ads
II. Remarketing
III. Display Network Primer
IV. Running
and Scheduling Reports
V. Tips and Tricks
Google Shopping and Product Listing Ads Defined
What exactly is Google Shopping? I’m glad you asked. Google Shopping and Product Listing Ads are essentially the same thing as of October 2014. The old
Product Listing Ads no longer serve on the network, so all campaigns created as of October 2014 will be Google Shopping ads. Google Shopping Ads are simply products that show
up in searches for specific products or categories, and the ads are taken directly from your Google Merchant Product Feed. Here is an example of a Google Shopping Ad for a
search on “taylormade driver”:
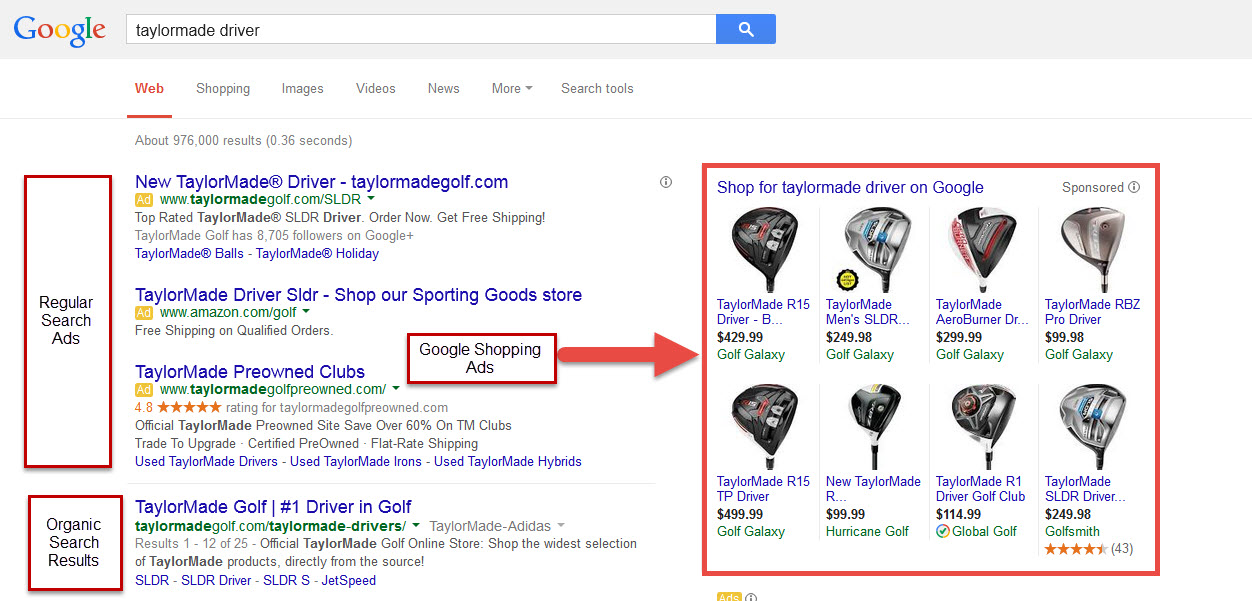
You’ll also notice in the above example that there is a
“shopping” tab above the search results. Just like if you are searching for images instead of web pages, you can choose just to search for “shopping products”. This is another
form of Google Shopping, but it uses the same Product Feed that you must submit to Google in order for your products to show up in search results. Click on the Shopping tab
and this is what you will see:
Google Shopping has been around for several years; however,
in 2012 it became a source of revenue for Google. That means, in order for your product feed (we’ll get into this in a little bit) to show up in a Google search you’ll need to
pay for the click…just like you do for a keyword in the search network. In the old days, back when I had to walk to school uphill (both ways), the clicks were “free”. You
simply had to upload your product feed to the Google Merchant Center, and if your product was relevant for a search…boom, you’re in business. That is no longer the case, and
since you are reading this right now…you will be able to take advantage of this powerful source of traffic.
You’ll also notice that there is a lot of information contained in a Product Listing Ad. We’ll get into exactly what a Product Listing Ad has when
we cover the Merchant Feed, but you can see that it includes a product description, product image, product price, product condition (new or used), and product
attributes.
When you are on the web search results and you click anywhere on the Product Listing Ad
you will be taken directly to the product page for that product and specific advertiser. In this example, if we click the first result we’ll be taken straight to the “Golf
Galaxy page for TaylorMade R15 Driver”. You can see how powerful this can be…the customer already knows what the product looks like, the price, shipping information, and
availability…all they need to do now is get out their credit card.
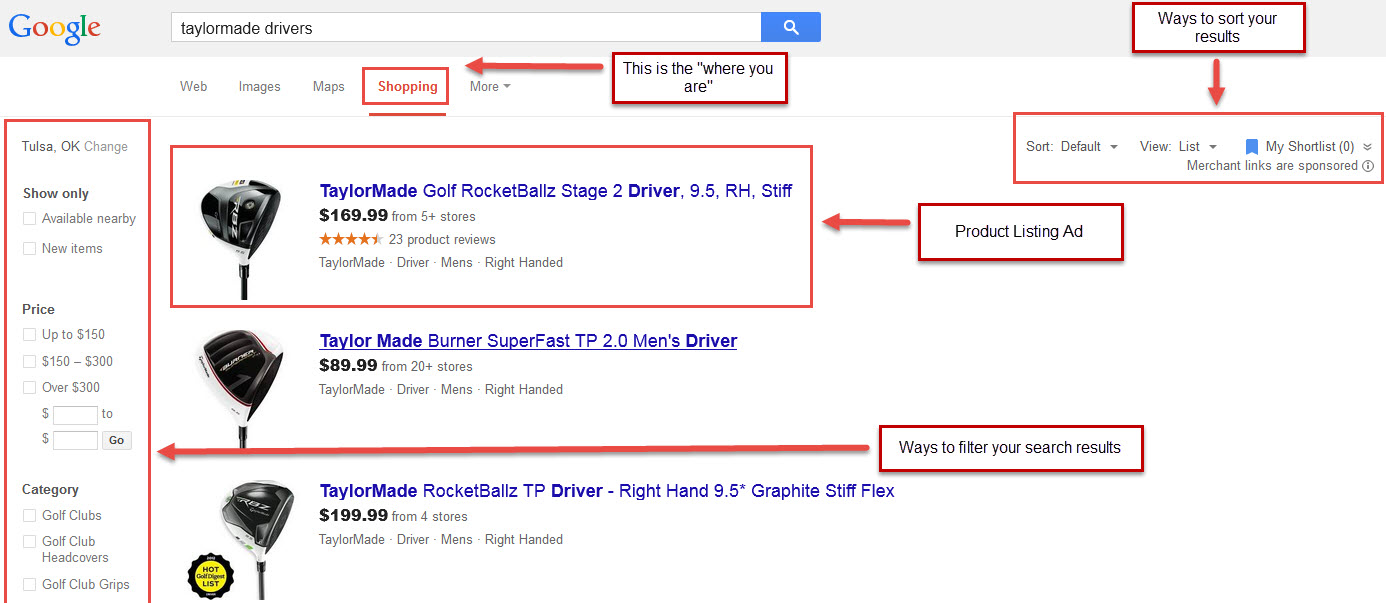
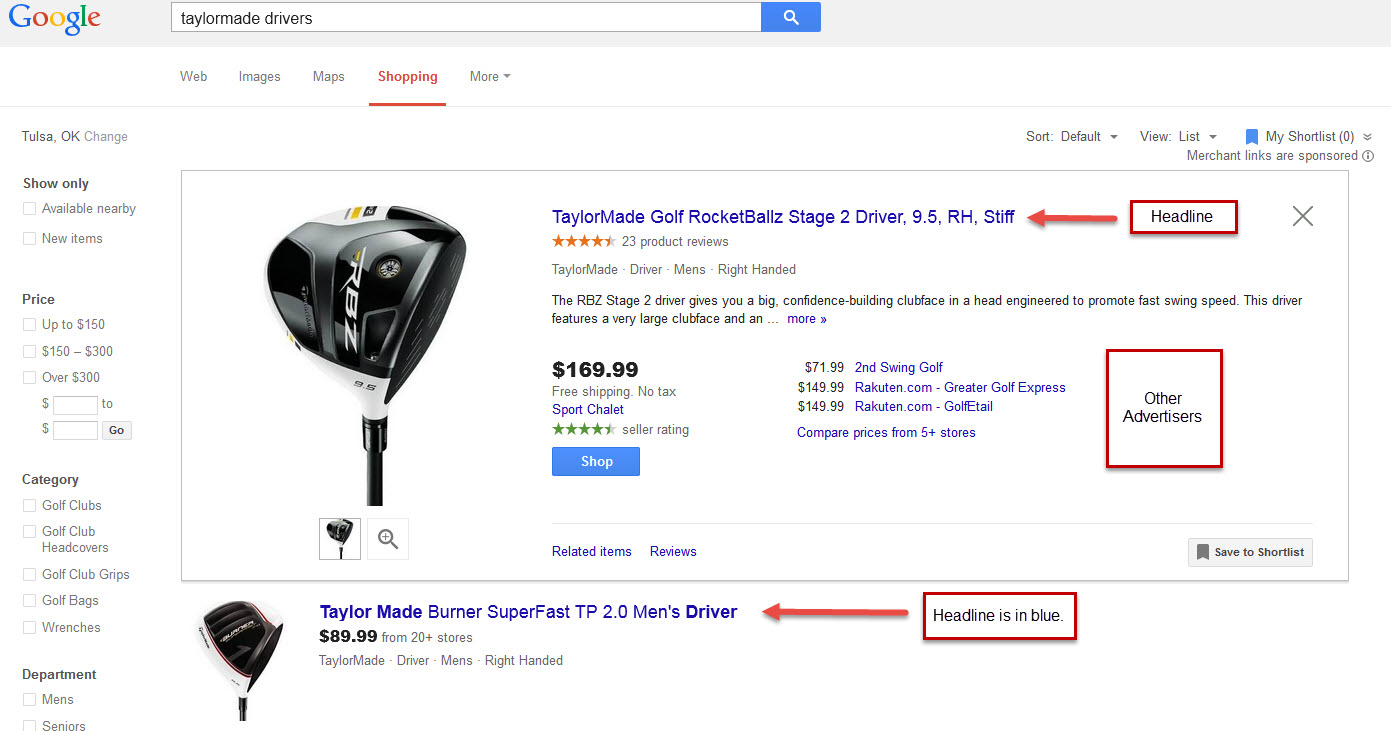
Here is a closeup view of the
search results on the web search page:
It is a different experience when you are on the “Shopping” tab.
If you click on the product title (the title is a blue headline), it will expand the product to give you more information. This information also includes different
advertisers, pricing, availability, product reviews, seller ratings, comparison shopping, and much more. This is much more like shopping for a product on eBay, Amazon, a
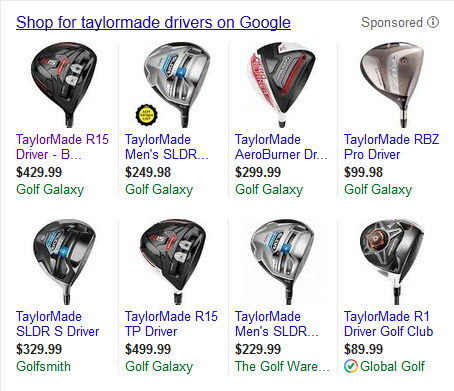
comparison shopping engine, or any other marketplace with multiple advertisers. Here is an example of what the Google Shopping Tab looks like:
As you can see, if you are selling products, and I know you
are because you’re reading this at AmeriCommerce.com the premier hosted eCommerce platform provider…then you definitely want to consider promoting your products in the Google
Shopping feed. However, as always, you’ll want to test the effectiveness of your product feed. There are some markets where Google Shopping is simply too expensive compete
profitably.
Now that we know exactly what Google Shopping is, let’s jump into how we get setup.
Download the Free ebook and the entire Hitchhiker's Guide series at HitchhikersGuideToPPC.com now!

Google Shopping and Merchant Center Setup
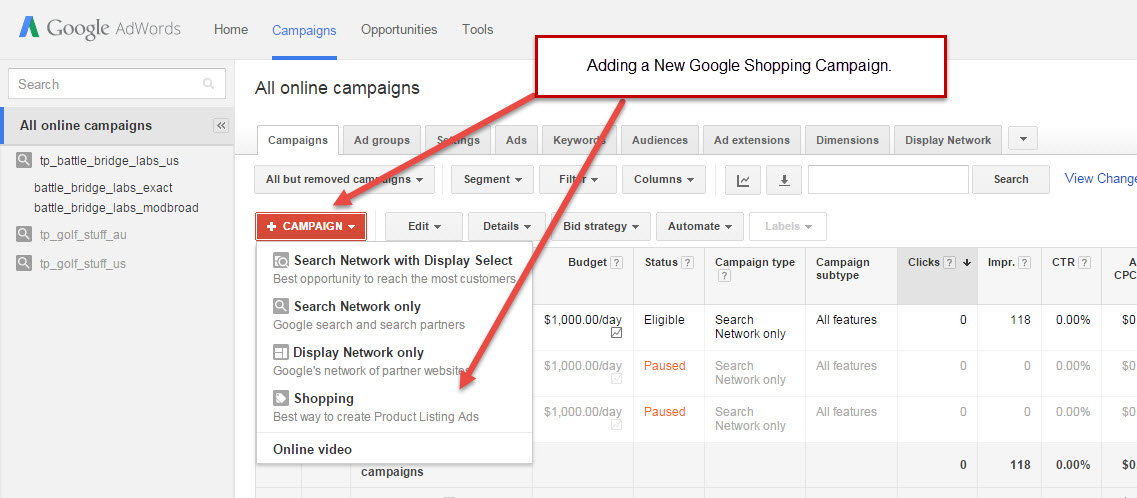
First login to your Google AdWords web interface or dashboard. Once you are logged in, click on create a new campaign, and then choose the Google
Shopping selection. See below:
Then you will be taken to the normal campaign creation
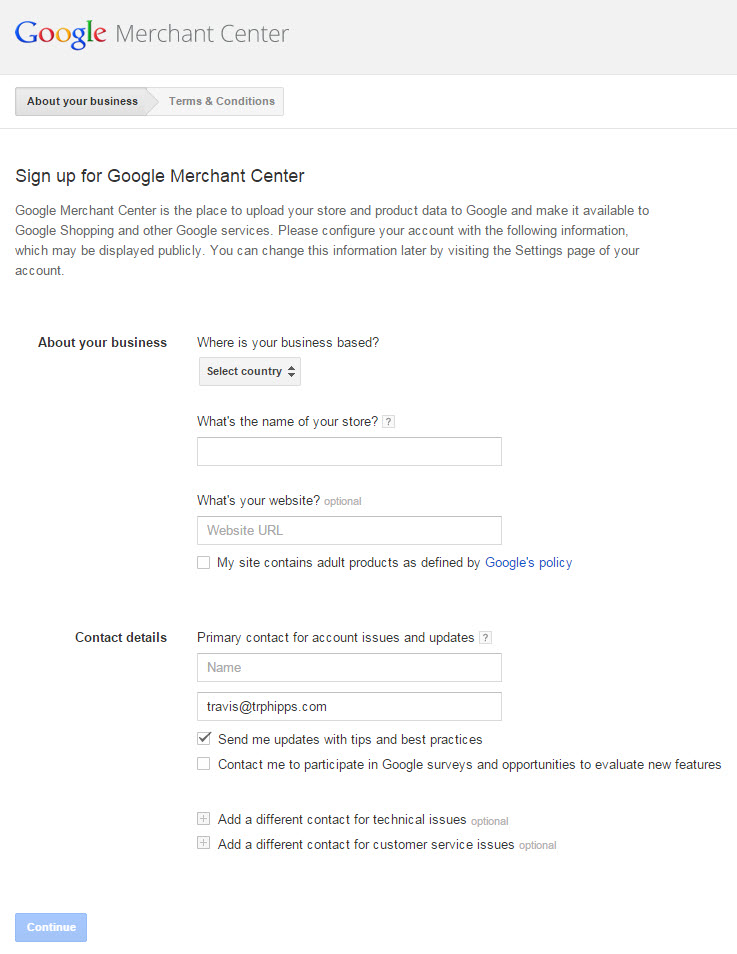
screen. I suggest naming your campaign according the same naming convention you have chosen for your other search and display campaigns. First, you will need to link your
Google Merchant Account with your AdWords account. If you haven’t created a Google Merchant Account, go ahead and do that now. Here is a link to create your Merchant
Account:
https://www.google.com/merchants/signup
Here is what the screen looks like to
create your new Merchant Center Account:
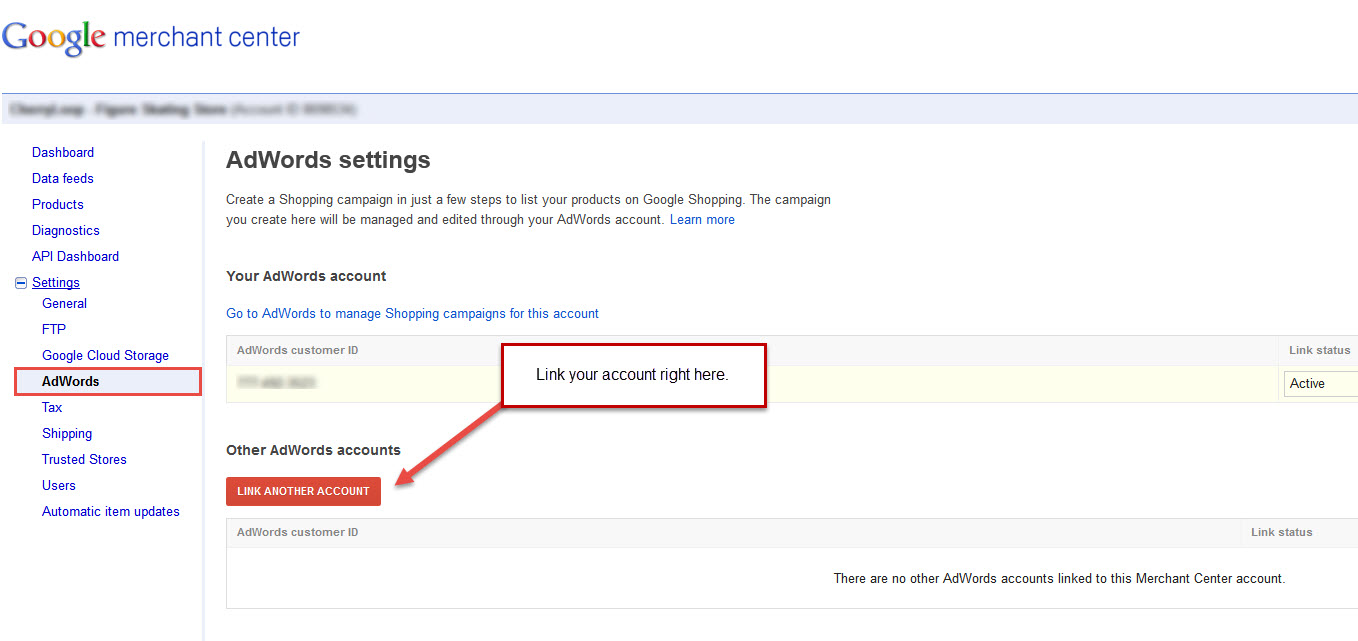
After you have successfully created your
new Google Merchant Account, you will need to link your AdWords account to your Merchant Account. You will do that inside the merchant center. Here is another screen shot of
exactly how to link these two accounts together. You only have to do this once, so don’t get all worried that you have to do this every time you create a shopping
campaign.
OK, we’re not quite there yet. We still need to create our
data feed. I know this is killing me too, but it is a necessary evil. Fortunately, if you’re on the AmeriCommerce platform they make this part easy peesy (I’ve never in all my
life used that phrase). Simply follow the directions in this support article:
http://support.americommerce.com/hc/en-us/articles/201903330-Google-Product-Feed-Set-Up
If
you’re not on the AmeriCommerce platform there are a lot of ways to create your data feed. It is important to note the “required” information that must be in your feed in
order for Google to accept it. The requirements differ depending on what products you are selling. For example, the requirements for apparel require more fields than for other
types of products. However, it is considered best practice to include as much information in your data field as possible. You will want to read through this help article by
Google completely before uploading and setting up your new feed. There is a lot of information to get through, but you will need to understand it all.
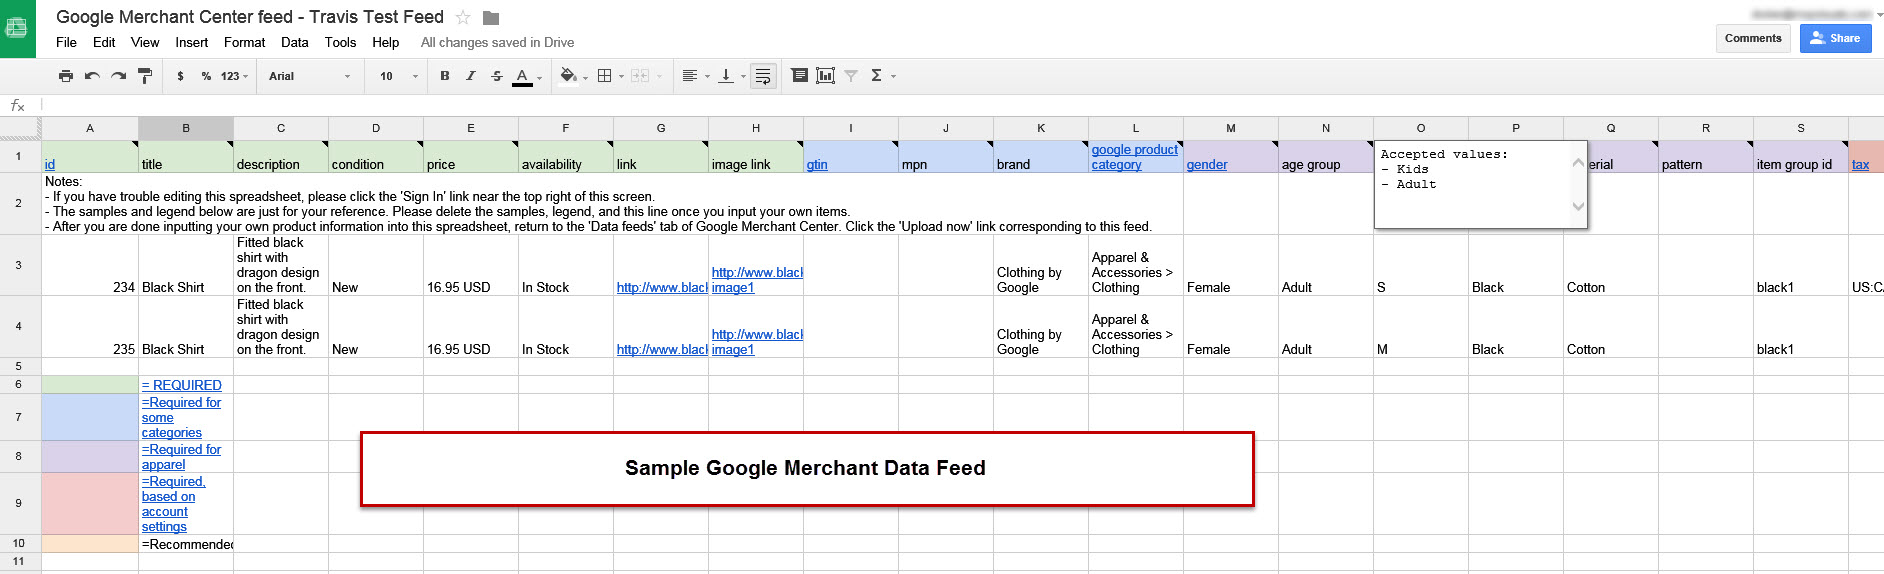
When you are inside the Google Merchant Center you can create a new data feed by uploading your own file or using Google
Sheets. Below is a screen shot of a feed that Google will create for you, but you will need to manually enter the information. If you’re doing this manually, this is a pretty
good way to go. You can create a schedule that will “fetch” the document from your Google Drive automagically at any point in time (ie: daily, weekly, monthly).
It is extraordinarily important that you keep you data feed
“fresh”. Funky fresh if you have the means. Google wants to know that your price is up to date, your inventory is up to date, shipping fees, etc, etc. The “cleaner” your data
feed the better.
Finally, we are ready to complete our new campaign creation. Whew, I thought that
would never end…but here we are. Let’s set this sucker up and launch our product feed out into the world!
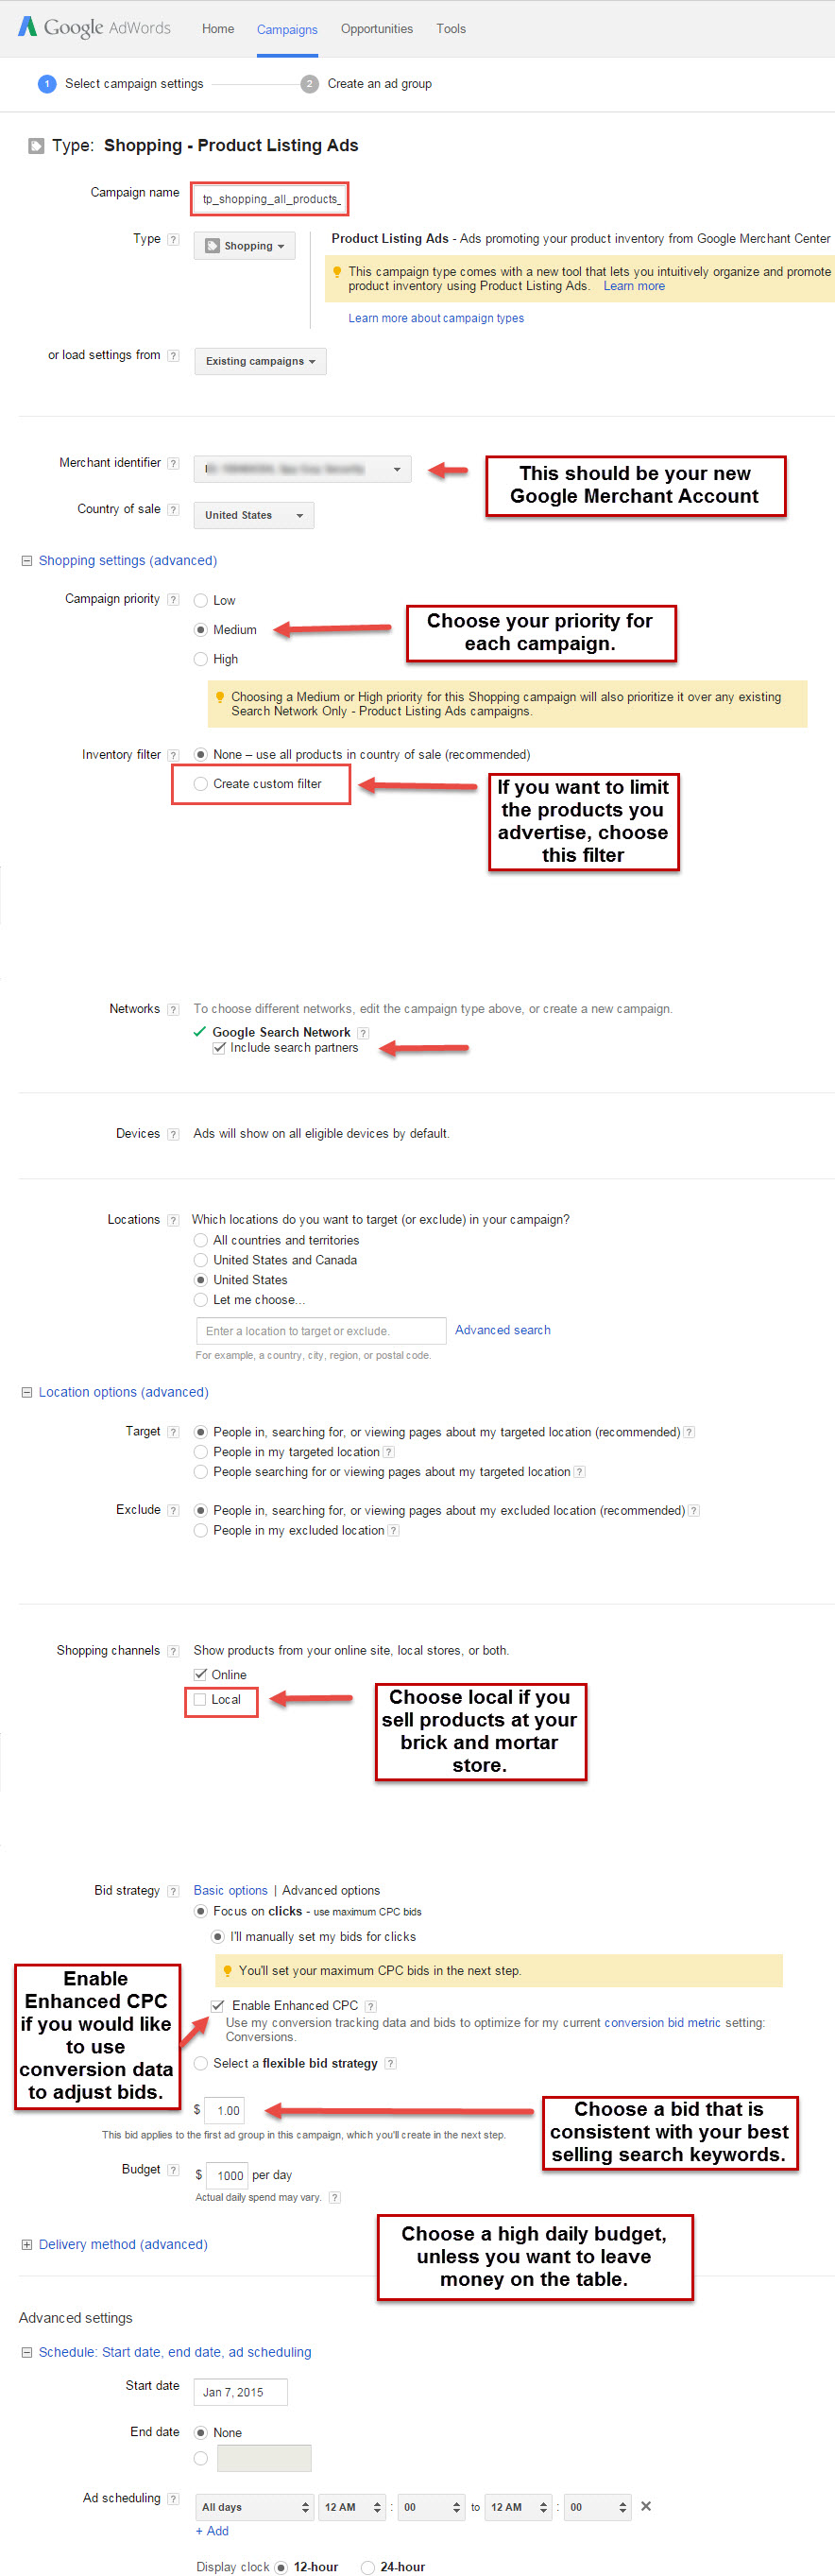
After all of that we are back where we started, at the campaign creation page in AdWords. Let’s go through some basic settings.
Since this is our first Shopping Campaign I like to create a campaign that includes all of our products. We can create
new/different campaigns later, and we may also want to create Product Groups…but we don’t want to do that until after we see how our original product feed performs.
First, we need to name our campaign. Sticking with our original naming convention we can go with something
easy like tp_shopping_all_products_us. It isn’t as important to keep a consistent naming convention, but it doesn’t hurt when running filters and reports (which we’ll do later
on in this module).
Second, we choose the “Merchant identifier” will be the ID created in the Merchant
Center.
Third, is choosing country of sale. This is required and is self explanatory.
Now we have “Shopping settings (advanced)”. And they do get a little advanced and difficult to
understand.
The first advanced setting is Campaign priority. The default setting
is Low, and that is what all products in your feed are originally set to. Since we are just launching a brand new campaign I like to set it to at least Medium, and usually
High. This will give our shopping campaigns higher priority, and that is a good idea because we’ll use this campaign to adjust bids for our new product groups (once we create
them). However, if we come to find out that our shopping campaigns don’t produce at a profitable level, we can drop them back down to a lower priority. It is important to note
that this setting only comes into play if you have multiple campaigns advertising the same product.
The second advanced setting is the Inventory filter. This allows you to filter out some products you don’t want to bid on, but they
will remain in your feed. For example, let’s say you also sell “used” Golf Clubs. You could exclude all products that are Used from your Google Shopping Campaign. That way you
know you’ll never have to worry about spending money on a set of products that you don’t want to bid on.
Now we move on to the other settings:
Networks: You can choose to “Include search partners”. I
almost always include the search partners. Unless you have a specific reason not to…go ahead and make this selection.
Locations: Choose the locations you want to serve your Shopping Ads.
Shopping
Channels: If you have a brick and mortar store, then you can also select “Local”. This will show your products at the local level, so people can come into the store and make a
purchase.
Bid strategy: This is definitely a matter of personal preference, and should be determined
by how well your other campaigns produce. If you are creating the campaign from scratch, and don’t have any data then you will be forced to choose “I’ll manually set my bids
for clicks”. You’ll want to set them manually anyway until you have enough conversion data to make some bid adjustments. Also, I normally choose “Enable Enhanced CPC”, just
like we do for regular search campaigns.
If you already have conversion data, and you have at least 15
conversions in a 30 day period…then you may want to consider using a flexible bid strategy. We discussed these strategies in Module 3. You can go back and review and see if
this makes sense for your Shopping Campaign.
Default bid: For new campaigns, just choose a bid that is
consistent for your best producing search keywords. You can adjust the bids as often as you like, so just make certain the bid is high enough to get clicks.
Budget: Everyone should know by now that I don’t like to limit a campaign by budget. So, I usually set the
budget at least $1,000 per day. However, if you’re nervous or want to try it out first…go ahead and set a more reasonable budget here. You can always raise it later (and it
may save you some money and a good night’s sleep).
Advanced settings: I would leave everything alone
here, unless you want to create a custom schedule. If for example, you don’t want to run your Shopping Campaigns on the weekend, then you can set that up right now. Otherwise,
just let it run all days and hours for now.
This is what the basic settings for a Google Shopping
campaign should look like:
DISCLAIMER: As always, let me remind you, that
each and every account, campaign, and product feed will perform differently. The above settings are intended to help you with the initial setup. Always test for yourself,
understand your own account performance, and choose settings that work best for you.
After you save
the settings you will be taken to the next screen where you can create product groups. For the purposes of this guide, we are only going to create one campaign that includes
all of the products. There are a lot of advantages to creating product groups, but since we haven’t collected any data on our product feed yet we can safely run all of the
products until we see some trends. If you do want to create a product grouping for different brands, best sellers, product types, etc…you can set those up rather easily. You
won’t “break” anything, just be careful with your bids…if you increase bids for certain product groups, you’ll want to have a good reason.
Remarketing
Ahh, yes…good old remarketing
or retargeting, you say potato I say potato (that saying works much better in verbal form). This was mentioned way back in Module 1, and if it wasn’t…then it definitely should
have been. Even if you have no intention of using remarketing you still want to start building your “audience” just in case. There really is no reason not to have remarketing
installed on your site.
What is remarketing? You read my mind. Remarketing is simply the ability to
tag a visitor to your site, and then you can serve up an ad to them on the Google Display Network at a later time. When remarketing first came out, it was revolutionary. This
allowed us as advertisers to get a second chance to sell something to every visitor who had already been to our site. Depending on your conversion rate, roughly 90 – 99.5% of
the visitors that come to your site will NOT buy from you the first time they visit. However, they may have an interest in your service, they just weren’t ready to buy. They
don’t walk on the lot lest they want to buy (I’m referencing Glengarry Glen Ross again). With remarketing we drop a cookie on their device, and then we can serve a text or
image ad to them on the display network.
If your wheels aren’t spinning, you might not have a pulse.
You can create ads with coupon codes, or special discounts, or highlight promotions and advertise to people who you KNOW have already been to your site. You can create
“audiences” of people who visit any page of your site, or visit a certain page of your site (think product pages or checkout pages).
One of the great things about remarketing is the fact that you can experiment with the effectiveness of the Display Network with
visitors who already actively searched you out. This is obviously very powerful stuff.
Google has
recently rolled out Dynamic Remarketing, and this is especially helpful for eCommerce stores. We used to have to create a separate audience (remarketing tag) specifically for
shopping cart pages, checkout pages, product pages, etc. But now with Dynamic Remarketing, Google does this for us…the best part…we get to use the data feed we already use for
Google Shopping. We won’t cover Dynamic Remarketing in this Module, but if you’re interested you can read up on it at the Google AdWords support site.
https://support.google.com/adwords/answer/6077124?hl=en&authuser=0&ref_topic=6077046&rd=1
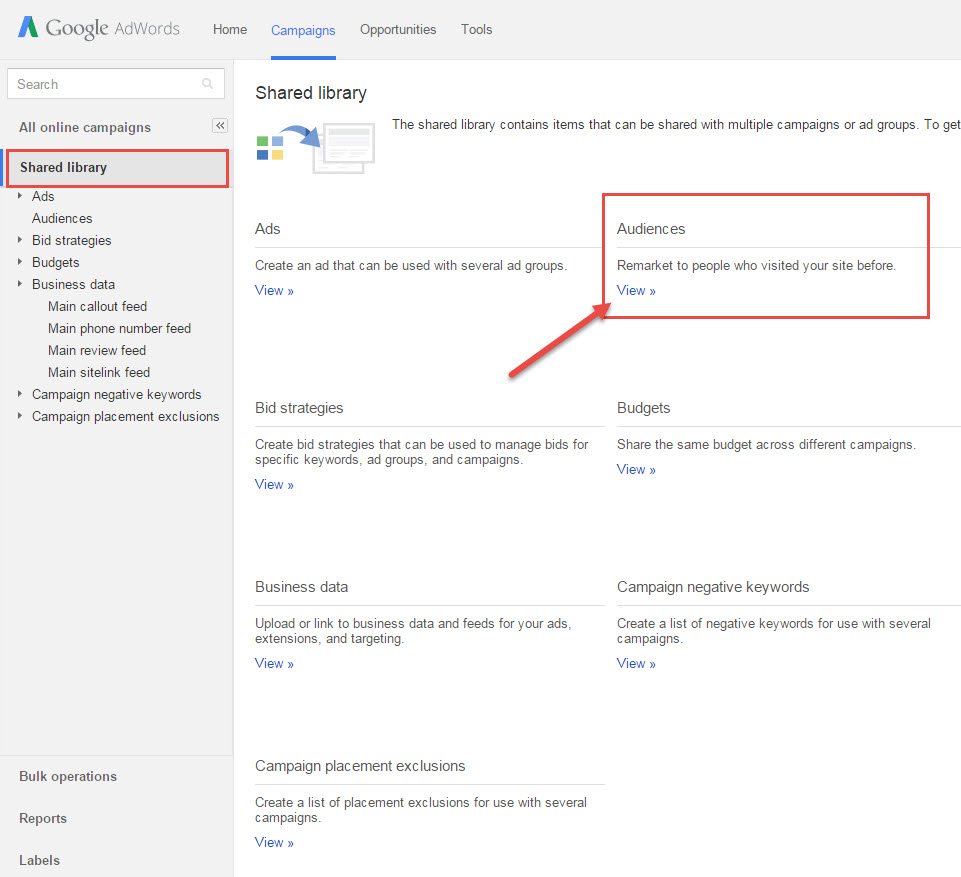
To get started with basic remarketing, the first thing you’ll want to do is create your audience. This is
done on the far left hand side of the AdWords interface, at the bottom you’ll see a tab called “Shared Library”. Expand that tab, and there you’ll see some more choices. We’re
looking for the Audiences. You can choose it from the left side navigation or in the body of the page. Click on the “view” link and then you’ll be taken to the promise land.
Well, that is quite an exaggeration, but you will finally be where we want to be. See both screen shots below:

Click on the “View” link:
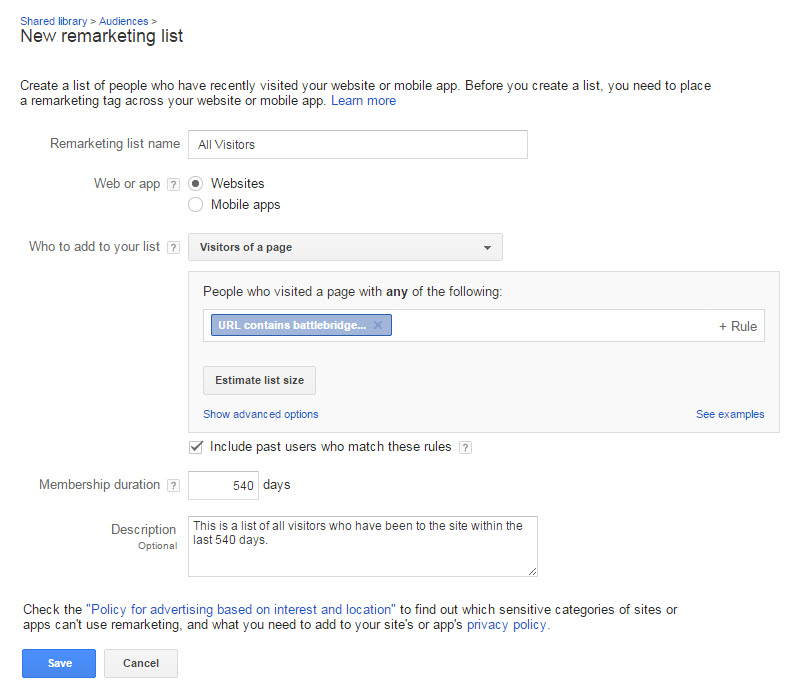
Creating a new remarketing list. Now is probably a good time
to mention that I highly suggest using the Google Tag Manager. Sometimes referred to as the GTM, yep…another acronym. The GTM sells itself. If you track conversions, create
audiences, and basically need to add any kind of tag to your site…you’ll want to use the Google Tag Manager. This makes it easy to create, edit, and update tags anytime you
want, without having to change the code on your website. Are you interested? I know you are…so, click here to learn more: http://www.google.com/tagmanager/
- Now that I have that off my chest, we can get back to creating our new remarketing list.
- First, name your list. You always want to have an “All
Visitors” list. So, let’s start with that…
- Then choose website or mobile apps. Unless you’re selling app downloads, choose websites.
- Who to add to your
list: We have a lot of choices here, but for our first audience we’ll select Visitors of page.
o Other options:
o Visitors of a page who did not visit another page
o Visitors of a page who also visited another page
o Visitors of a page during specific dates
o Visitors of a page with specific tag
o Or…drum roll please, a
Custom Combo!
- You’ll need to add the URL you wish to tag
- There are some advanced options where you can choose a URL they have visited, and add conditions regarding
the referring URL or the actual URL.
- Membership duration. This determines how long you keep visitors on your list. The maximum is 540 days (that is a LONG
time). I like to have at least one list/audience with the maximum duration, all visitors, and no conditions. This basically allows us to remarket to anyone who has visited our
site in the last 18 months. Expert Hint: if your business is seasonal at all in nature (ie: you do a lot of sales during the holidays, or the summer), if you keep a list of
visitors longer than a year you can advertise to this list the NEXT season. I know, right?
- Description: This is just for your eyes, so you can put anything in the
description you like.
- Click the Save button, and you are good to go!
Here is a
screen shot of the New remarketing list page in action:
Now, you’ll need to either email the remarketing tag to
yourself or your developer to install on your website. You can also retrieve the tag code at any time by putting a checkmark next to the list, and choosing “View tag details”,
and then selecting Setup, and finally “View AdWords tag for websites.
We mentioned the value of the
Google Tag Manager earlier, and this is one of the many places it really comes in handy. You can create a custom list for a variety of actions on your website (as you can see
from the custom lists above). Instead of sending each tag/code to your web developer (or doing it yourself), you can simply update the GTM and you are off to the races. I
promise I don’t work for Google or on the GTM team, this is just an incredible advancement in remarketing and tracking.
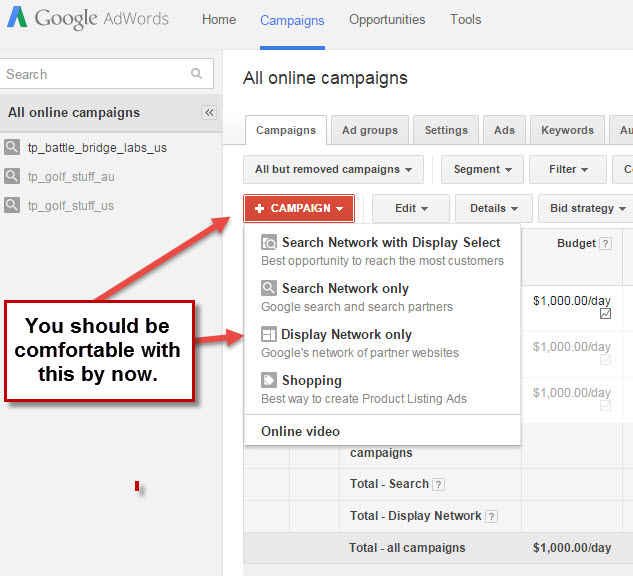
Creating a Remarketing Campaign
We have created our first
remarketing list, we’ve installed the code on our website, now we need to create campaign. We’ve done this for our search campaigns and our shopping campaigns so far, so we
know how to do this. Just a few minor tweaks, and we’ll be serving up ads in no time.
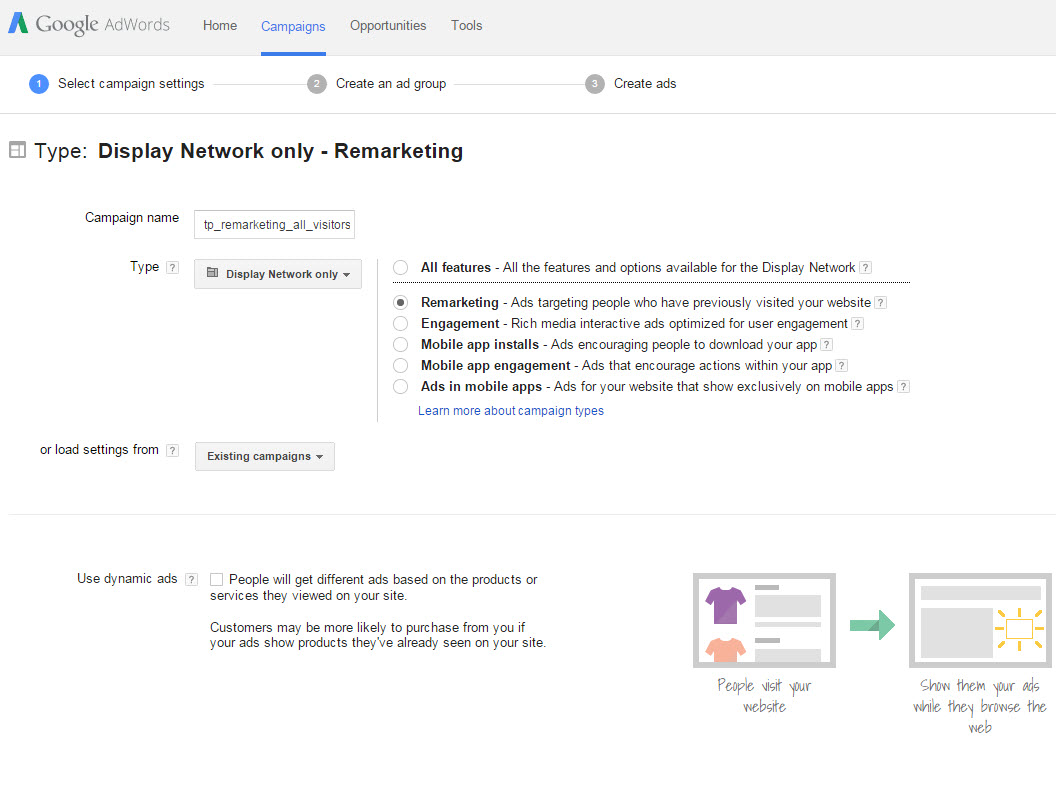
1. Click on the red “+ Campaign” button.
2. Choose “Display Network Only”.
3. Choose the
“Remarketing” radio button.
4. Name your Campaign (hint: it will
look something like this: tp_remarketing_all_visitors
5. Skip down
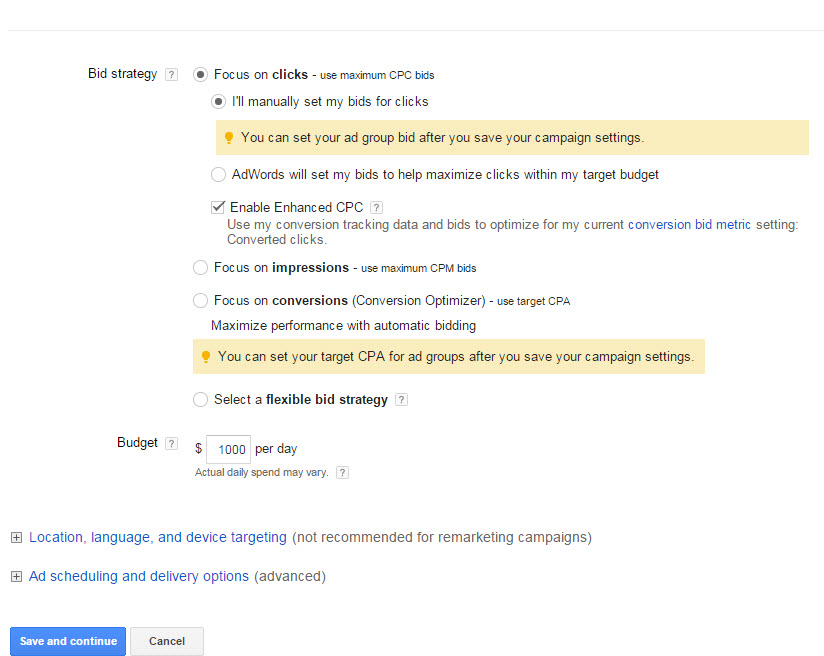
to Bid strategy. You can choose “I’ll manually set my bids for clicks” and Enable Enhanced CPC (you must have conversion tracking for this option).
6. Pick a budget
7. If you want to choose an ad schedule, now is the time to do this…as always, you can adjust
the ad schedule later…but if you know you only want to show ads during the week, this is an easy time to set it up.
8. Save and continue.
Side note: You will notice
that you can also choose to “Use dynamic ads”. Dynamic Remarketing goes beyond the scope of this course, but let me tell you…it is awesome. You’ll use your product feed just
like you do in Google Shopping, and it will serve up ads based on specific products that the visitor had viewed. Yeah, it is that cool. It is done automagically for you too…
Remarketing Ad Group Creation
You’ve just created your first remarketing campaign, and now we must create an ad group. This step is super
easy, and has only a few options:
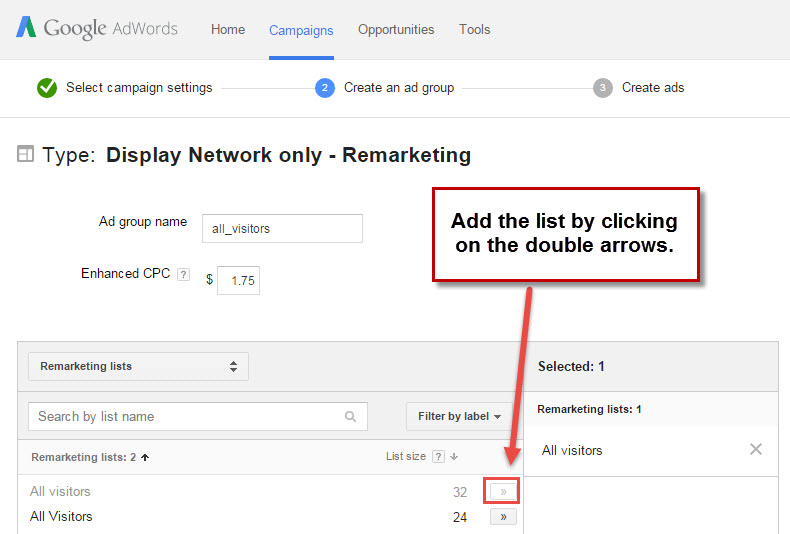
1. Ad group name: You can call this
anything, I just like to keep the word “remarketing”, and a description of the list I plan to use. In this case it will look like this: remarketing_all_visitors
2. Choose your bid: Since we chose Enhanced CPC that is the option it will give
us. You should start off with a bid high enough to get clicks and visitors. You’ll adjust the bid as you review the performance of your remarketing campaigns. You can always
use the little trick I taught you in an earlier module. Take your target CPA x Conversion Rate = Bid. If your target CPA is $75 and your average conversion rate is 2% then a
profitable bid would be $1.50. I usually take that bid and increase it so I can be assured to get some traffic.
3. Then you choose Remarketing lists. Since this is our list of “All visitors” we hit the double arrows and it will add this list to
our ad group.
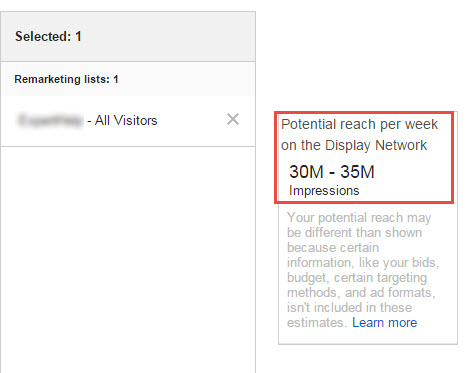
a. After you have selected the list, it will give you a
“Potential reach per week on the Display Network”. This is good to know if you need to narrow your target, or leave it the way it is.
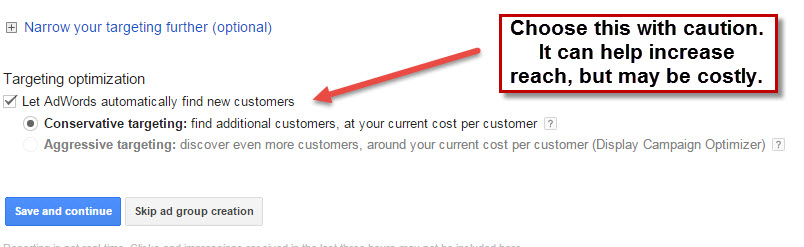
4. You can the choose to Narrow your targeting. But since this is a remarketing campaign, there is no real
reason to do this. We will cover this briefly in the Display Network Primer.
5. Google has a new option called “Targeting optimization”. If this is a new campaign, you may want to consider selecting this option. What Google
does is uses demographic data from your existing remarketing list, and identifies similar customers. Then it will serve up your remarketing ad to them, just as if they had
visited your site. This is pretty cool, but it can get out of hand. So, if you do choose this option, you’ll want to keep a close eye on your clicks/conversions!
6. Click Save and Continue.
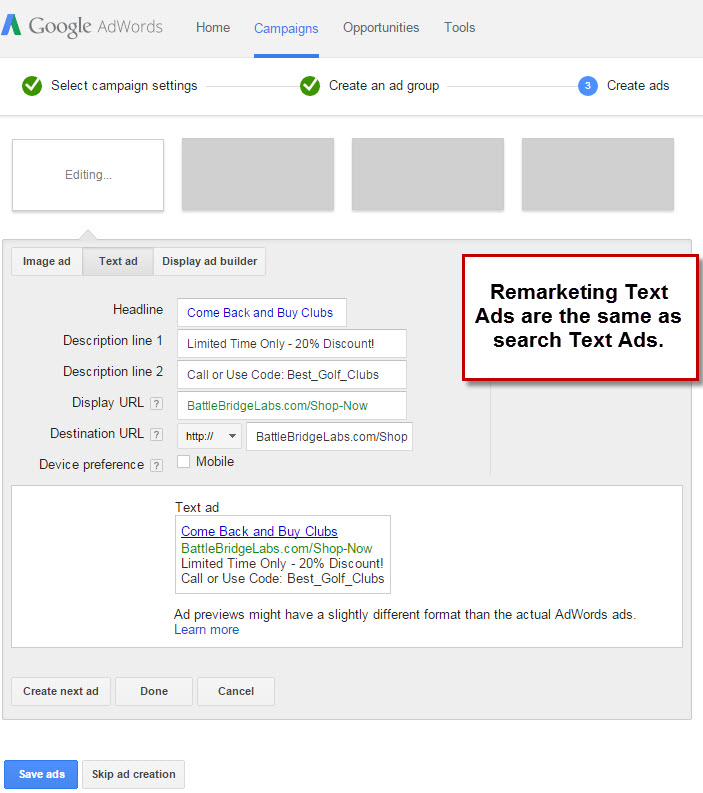
Creating Remarketing Ads
We’ve successfully built our Remarketing list, created a campaign and ad group, now we need to fill the ad
group with some ads! It is a good idea to start with a Text ad, and that is the screen that pops up after you save your Ad group.
Below is what the Text ad creation looks like. After you have created at least two Text ads, click done.
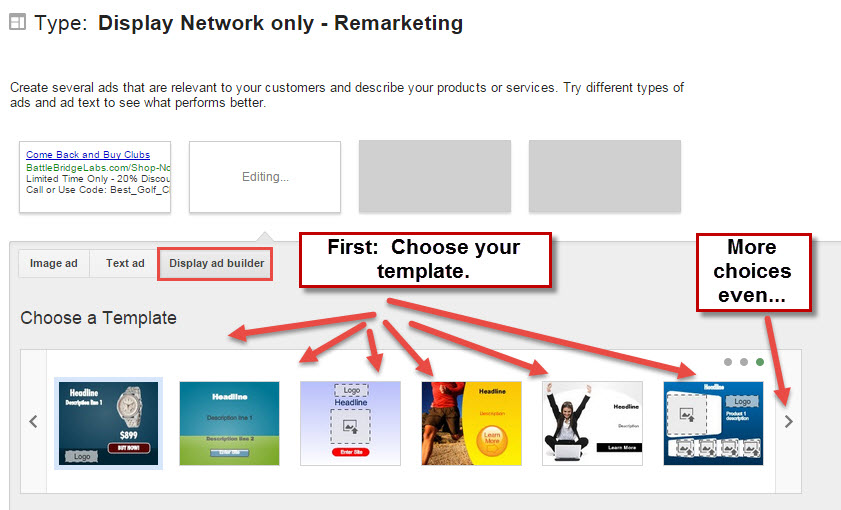
Creating Display ads with Google AdWords (No Designer
Necessary)
So, you want to create some Image Ads, but you don’t have any design skills? Well,
you could hire someone to do it for you…but that of course costs money. Well, Google wants your money so bad, that they are willing to create ads for you…for free! Yep, just
to get us to spend more money on advertising, they’ve put together a pretty handy dandy (that is another phrase I’ve never used before…what’s up?) “Display ad builder”.
You can add your own copy, headlines, etc…you can customize the color scheme, and more. They make it so
easy, they even scan your website and produce a bunch of suggestions. So, in a matter of minutes you’ve got ads running on the NY Times, and you look legitimate (I’m not
saying you’re NOT legitimate, but this definitely makes it easy).
Check it out:
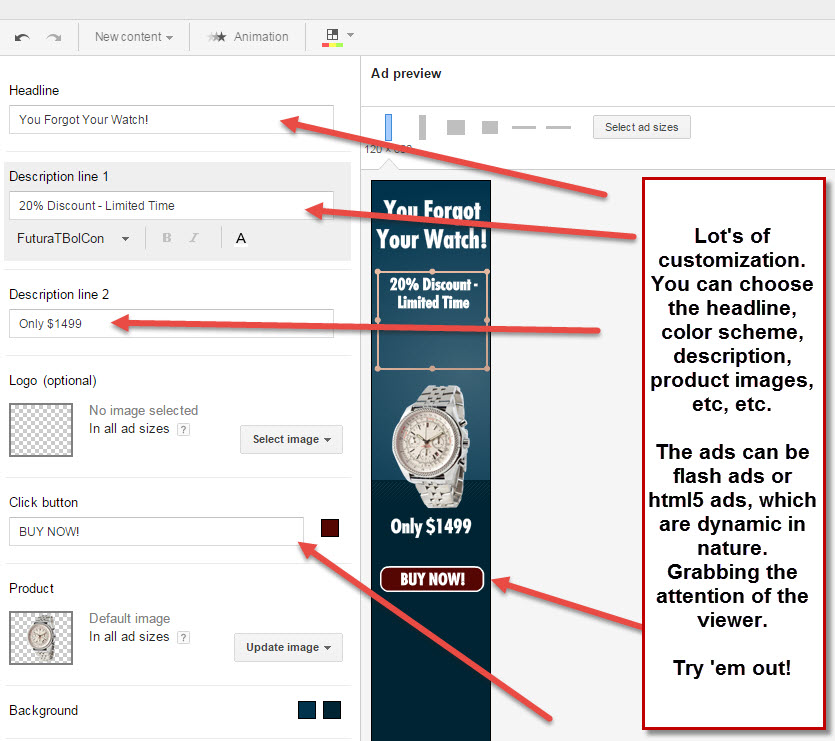
Boom, goes the dynamite! That’s right…5 minutes later you
have custom built, flash, ads serving up all over Google’s Display Network. It is that easy…I really wish they would have had this tool when I was starting out.
The other alternative is to create your own custom ads. This is what I’ve done for years, and there is
nothing wrong with this…it is just time consuming and expensive. However, you definitely have the added benefit of staying true to your brand and design. You will want to
create ads for all of the sizes (I don’t like to be limited to which sites I can advertise on because I don’t have the correct ad size.
After you’ve saved or uploaded your ads, you will have to wait a short period of time for the ads to be approved. This process
usually happens very fast, so don’t worry about it too much.
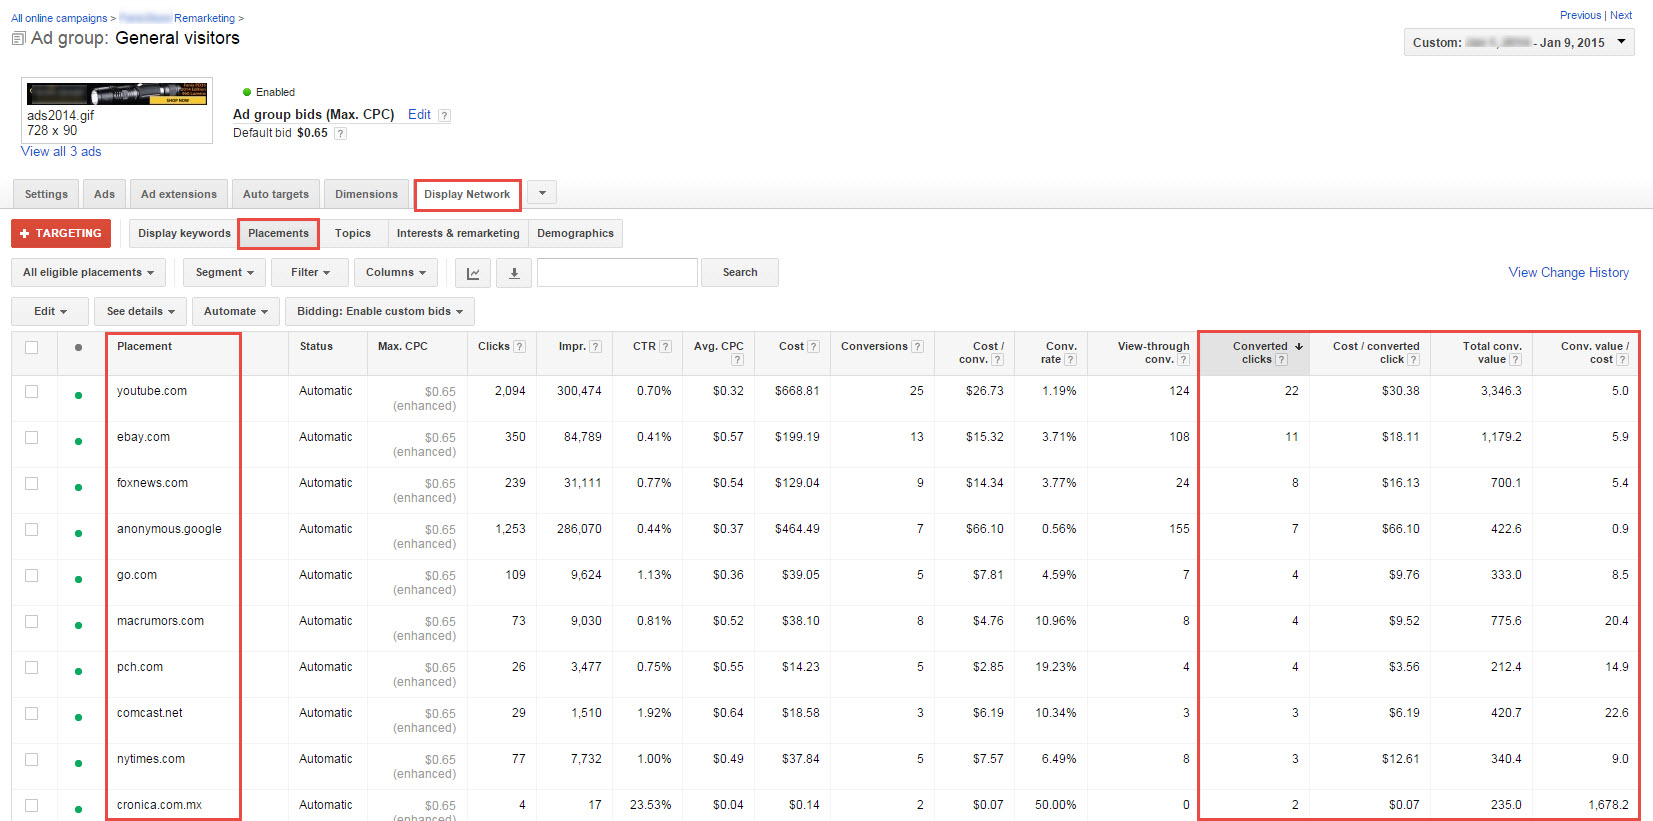
This should get you going with your
remarketing ads. Just like all campaigns (and all advertising, for that matter) you’ll want to see how profitable, effective, and productive your ads are. Here is how you find
out which placements (a placement is the site where your ads are showing) are producing for you, and which ones aren’t. This is probably the best way to see how effective your
remarketing is (outside of just a standard campaign report).
Here is how you checkout the
placements:
1. Click on your remarketing campaign.
2. Choose the ad group you want to analyze.
3. Click on the Display Network Tab.
4. Choose the Placement tab next to the +targeting button.
5. Then you can add columns to your view just like in your normal campaign view.
6. Sort by cost, converted click, cost/converted click, or any value you like.
Here is an example:
Remarketing
Conclusions
As you can clearly see, remarketing can be a very powerful tool to have in your toolbox. We know for a fact that a large percentage of visitors to our site will not buy
the first time they visit. In many cases we’ve paid dearly for that visitor, and at the very least we’ve worked hard for the organic traffic our site brings. Why should we
just let them leave and never look back? The answer of course, is we shouldn’t. Let’s drop that cookie on their device, and advertise to them again in the future.
Not only do we get a second chance at advertising to a past visitor, but remarketing affords us an excellent
opportunity to try out the Display Network. Since remarketing uses the Display Network, we can find out what other sites visitors to our site frequent. We get to find out the
sites that generate the most interest, leads, and sales. If we are only using the Search Networks, we are leaving a vast majority of the traffic on the table. If we ignore
that traffic, we risk losing revenue, market share, and customers.
Display Network
Primer
This is a perfect time to jump into the Display Network. I just hinted at the fact as
we finished up the Remarketing Section of this module, and obviously there is a connection between remarketing and the Display Network. Advertising on Display is such a
completely different mindset; therefore, using Remarketing as a way to introduce ourselves slowly and with much less risk is something I always recommend.
With that in mind, I suggest you run your remarketing campaigns for several weeks, and analyze the data. Find out which
sites convert, who your demographic is, and as much information as you possibly can. Then you can create Display Campaigns with that knowledge and you’ll be able to make the
following target selections wisely.
Let’s walk through a quick Display Network Campaign Setup, and
we’ll also get a better understanding of how you can use audiences to target your demographic.
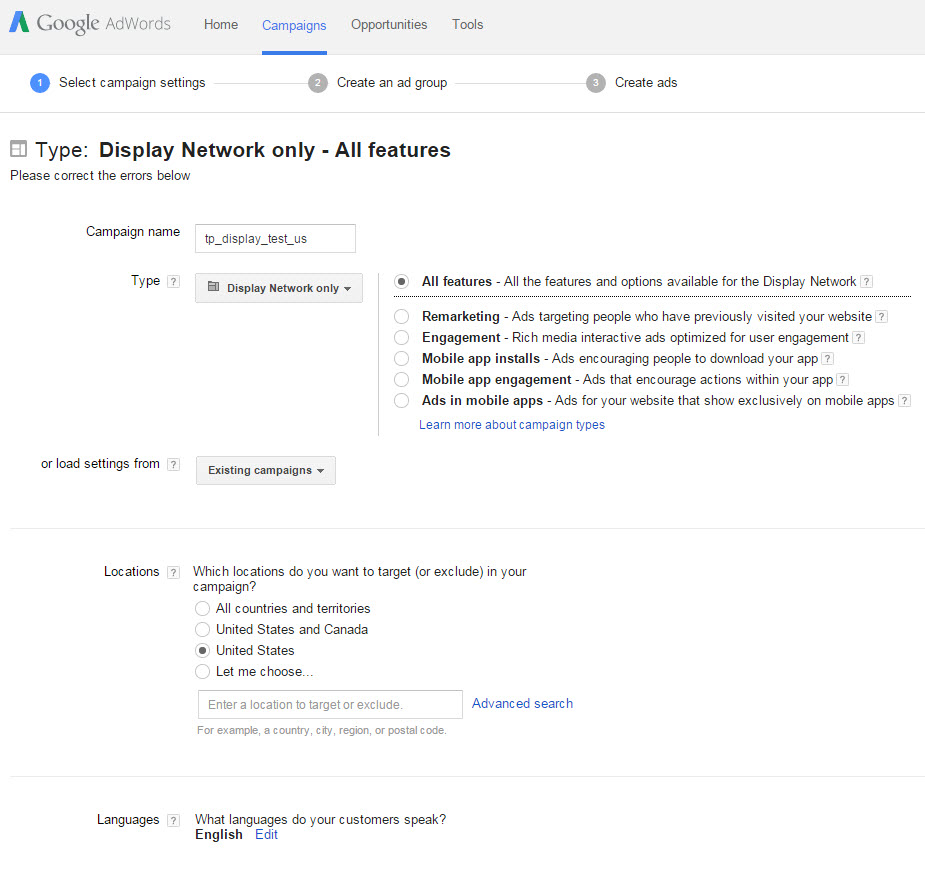
1. Click on our old friend, the red +Campaign Button: 
2. Choose Display Network Only.
3. Click the
radio button: All features
4. Name your campaign
5. Choose the location you want to serve the ads. It is probably best to start with the country you
currently do the most business, and then add other countries later (and to a different campaign).
6. Choose your language (this usually defaults to the language of your website, but it doesn’t hurt to check it).
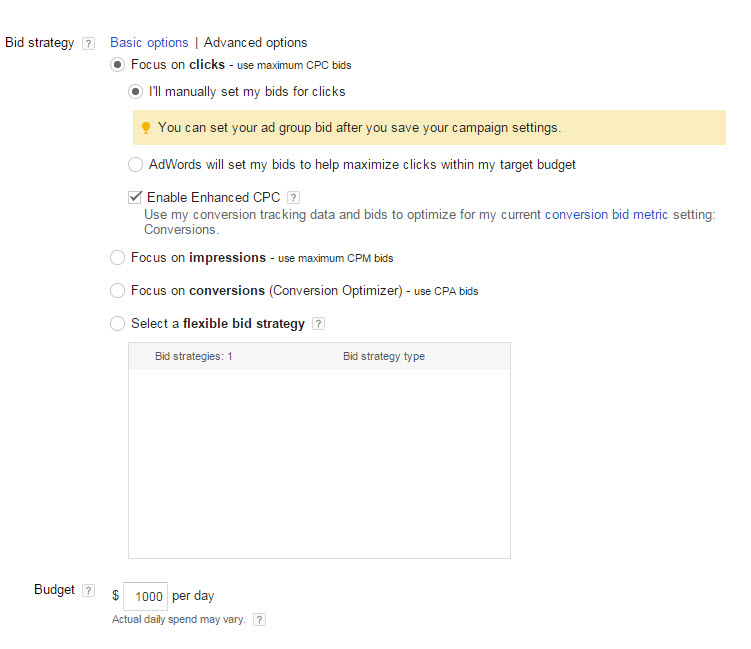
7. Choose your bid strategy. Same rules apply here as they did to our remarketing campaign. If you have
enough conversions you can use the Conversion Optimizer or a Flexible Bid Strategy…if not, stick with manual bids and enable Enhanced CPC.
8. Choose your budget.
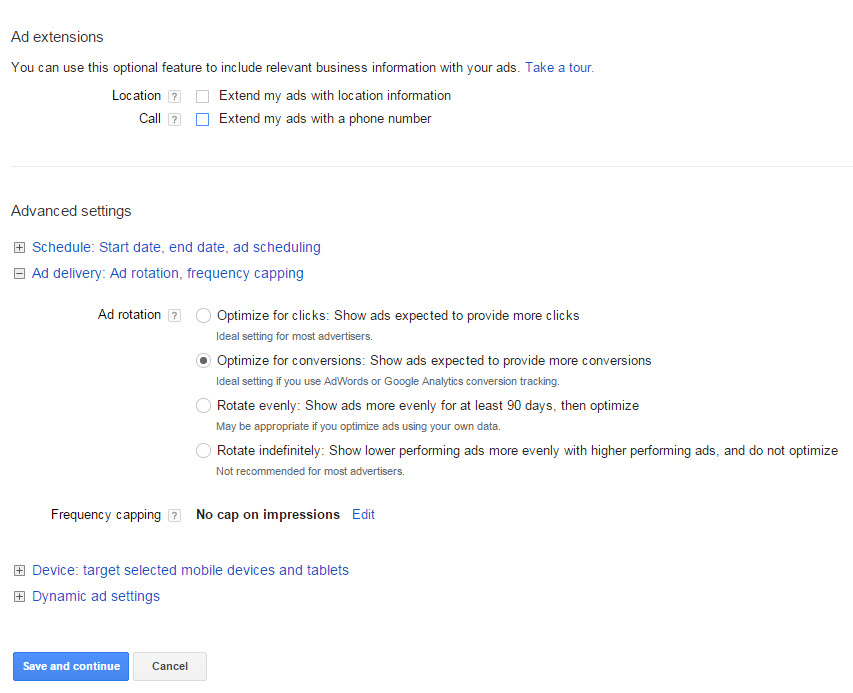
9. I’m a big believer in Ad extensions, as you know from previous Modules. Use your location and phone number to extend your Display Network
ads.
10. Under the Advanced settings we have the following you will want to
consider:
a. Schedule. You know how I feel about the schedule. If it makes sense
to adjust bids during certain times of the day, this is where you do it.
b. Ad rotation. We covered this at length in a previous Module, but it doesn’t hurt to discuss it again.
1. Depending on the time you have available, the number of clicks, and your experience with testing here are
the choices I would make when choosing Ad Rotation:
a. Optimize for
conversions: This is the easiest and lets Google do the work. You lose some control, but it does save time (and it is possible, Google will do a better job than you anyway…no
offense!).
b. Rotate evenly, then optimize: If you want to test at least 2
ads, and then let Google choose the winner after 90 days (just in case you forget!). This is an excellent option.
c. Rotate indefinitely: This is for all of the control freaks out there. You risk running a “losing” ad for an extended period of
time, but you gain control and get to choose your own KPIs (key performance indicators).
c. Frequency capping. There are several schools of thought on this subject, and each side is very passionate about their opinions.
1. This setting allows you to choose how often and how many impressions a
visitor sees your ad.
a. There are a lot of valid reasons to set this cap.
Many people feel that there is something called “banner blindness”. This means that you see an ad so many times that you become blind to it. There is data to back this up, and
data to debunk this theory.
b. You may also want to limit the number of
impressions simply because of a marketing or branding preference. I prefer to work on data, and suggest testing impression capping vs unlimited capping, but this is also a
valid reason to set a cap.
c. Not setting a cap allows your ad to show
to the same person an unlimited number of times regardless of whether they click on the ad or not.
d. Devices. You can choose what type of devices and/or operating systems your ad appears. If you have data from your analytics software, you may
want to use this information to choose the types of devices you serve your ads to.
e. Now you can save and continue, and we’re onto the Ad group stage.
Here
are the screen shots from the Display Campaign Creation pages:
Display Ad group creation
Campaign created, now it is
time to create our Display Ad group. In Display the Ad groups are a little different than in search campaigns. The main reason for this is your ability to target your ads. At
this step you can make the following choices:
1. Display
keywords. This is very similar to search. You simply choose a bunch of keywords you would like to target and Google will run your ads on sites with those keywords. There are
some significant differences, the most important being…there are no “match types”. All keywords are broad.
a. You simply type the keyword in the box, and then add it by clicking on the “double arrow”.
b. Google will also “find related keywords” for you. You probably already have a good idea what keywords you
want to target; however, it never hurts to see what’s out there!
2. Interests & remarketing. We are already familiar with remarketing, and we can choose any of our remarketing lists at this time. But now we can
also choose audiences. There are three different types of audiences, and each has its advantages.
a. Affinity audiences. This creates a list of users with long term affinity for products or services.
b. In-market audiences. This targets users actively looking for a product or service. This is obviously very
cool and powerful.
c. Other interests. You can reach users and audiences who
recently visited sites on a certain subject. They may not be long-time or affinity visitors, but they have expressed a recent interest.
3. Different targeting methods
a. Topics. The difference between topics and interests is that topics are targeting the sites themselves (not the users). So, if you sell after-
market Ford car parts, your ad may show on a Ford owners group blog. You can choose your topics, and add as many as you like.
b. Placements. You can choose which sites you would like your ad to appear. This is a great way to get bang
for your buck. You can type in a search term, and Google will give you specific sites that you can advertise on…and give you the estimated Impressions/week. You can choose as
many placements as you like.
c. Demographics. This is another powerful
targeting method. Simply choose the demographic of your ideal customer, and Google will only serve up ads to customers in that demographic.
Once you have chosen your targeting method of choice, and you are satisfied with the available impressions…simply click on the
“Save Ad group and continue”.
The next screen will take you to ad creation. Since we covered this at
length earlier in the module, we’re going to skip in now. I will mention that you can have google create image ads for you, you can use text ads, and you can upload your own
image ads for the Display Network.
Display Network Conclusions
You have successfully created a new Display
campaign, Ad Group, and some ads (creatives). Now, the hard part comes into play. You must identify which sites, demographics, target audiences, etc work well for your
business. There are a lot of settings, levers, and pulleys in the Display Network. This is where the money is made and the savings happen. I’m not going to lie and say this is
easy, because well…that would be a lie. You need to launch some Display campaigns, and keep a very close eye on a lot of metrics. The advanced techniques it takes to be
successful in Display is beyond the scope of this course, but it is possible. Use the tools at your disposal and your new found confidence you’ve gained working with your
search campaigns. You’ll learn that this really isn’t rocket surgery (see what I did there?), but it does take time, effort, and some money.
Running and Scheduling Reports
This portion
of the course isn’t very sexy, that much is true. But if you ignore the reporting, all of your other work is more or less a waste of time. I’m going to keep this section short
and sweet. I’ll show you my favorite reports and how to run them. After you’ve learned how to run a report or two, tweaking them to fit your needs is rather simple.
Campaign Reports
The important thing to remember for all reporting within the AdWords interface is to add the columns that you’ll be reporting on frequently. There is a difference
between “views” and “reporting”; however, I usually like to set my views so that I see the data I will be reporting on consistently. Let’s walk through how to add columns to
your view so that we can easily run reports against it.
Here are the columns I like
to have showing at all times:
- Budget (you can’t remove/hide this column)
- Status (you can’t remove/hide this column)
- Campaign type: If you want to sort or run reports by type, this is always good to have.
- Campaign subtype. Ahh, you decide if this is important to you or not.
- Converted Clicks: I like to run my reports on converted clicks as opposed to conversions. We covered the difference in Module 2. Feel free to review to make your
own decisions.
- Cost/Converted Click: Basically your CPA
- Value / converted click. This is essentially your average order value per converted click.
- Total conversion value. This is your revenue, or a total value you have assigned to conversions.
- Conversion value/Cost. This is our ROAS – Return on Ad Spend.
Here is how you
customize your columns:
1. Click on the “Columns” button.
2. Choose Customize Columns.
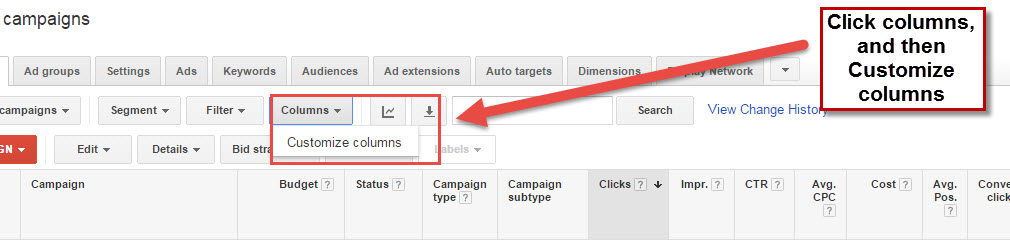
3. Then you are taken to the next screen where you choose the columns to add.
4. Each column is in a category called “metrics”. Choose the metric, then click on the “double arrow” to add your column.
5. You can also remove columns by clicking on the x.
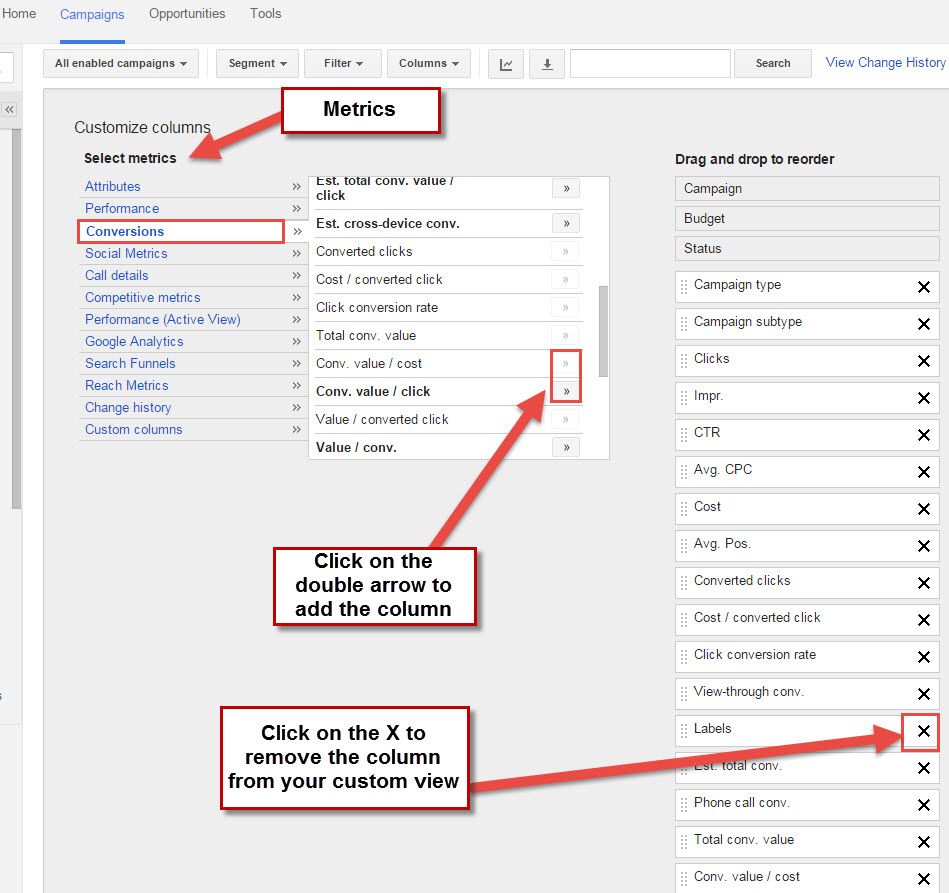
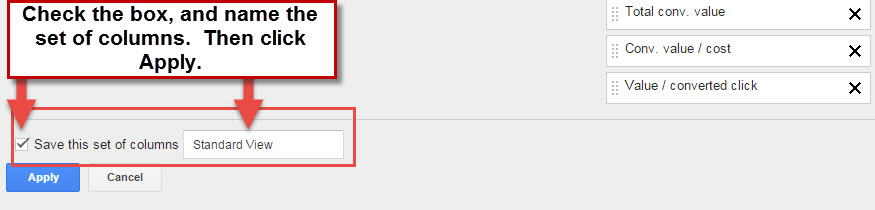
6. After you have the columns in place,
you can save the set of columns and give it a unique name.
7. Then click on
Apply.
Now that we have our columns and view established, we can run
a campaign report.
For campaign reports you’ll want to be on the campaign tab, and have the correct
“auto-filter” in place. By “auto-filter” (a phrase I coined), is simply which campaigns will be showing. You have the following choices:
- All. Shows all campaigns, active, paused, and removed (deleted)
- All enabled. Shows all active campaigns
- All but removed. Shows all active and paused campaigns.
This is pretty self
explanatory. Depending on what I am doing…I usually set it to “all enabled” or “all but removed”. Once it is set, then choose your desired date range. Choose whichever date
range you are trying to compare. There are many pre-set date ranges (ie: Last Month, Last 30 days, This month, etc, etc).
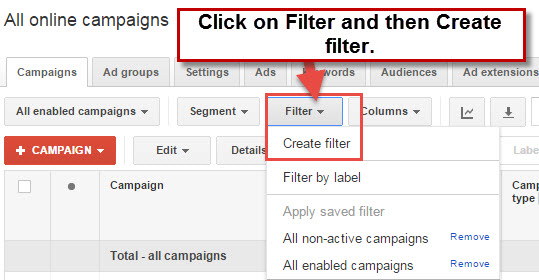
Now we’re going to want to apply some basic filters. For campaign reports, I like to filter out any campaigns that don’t have any clicks. You can
filter out campaigns by almost any metric possible. Filters are your friend. Use them early, and use them often!
1. Click on Filter, and then Create Filter.
2. Click on the drop down box to choose what you want to filter by. In this example, we are going to choose clicks (greater than or equal to
1).
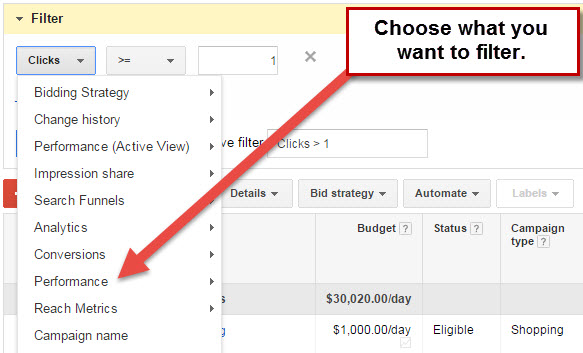
3. Then you can save and name the
filter, so you can use it again.
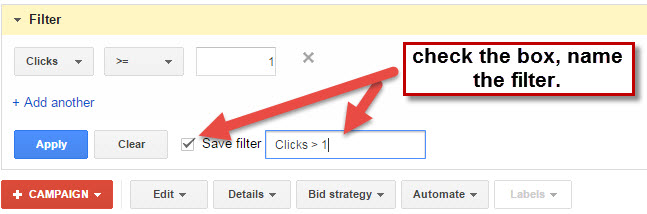
4. Then click Apply. And it will filter
the results.
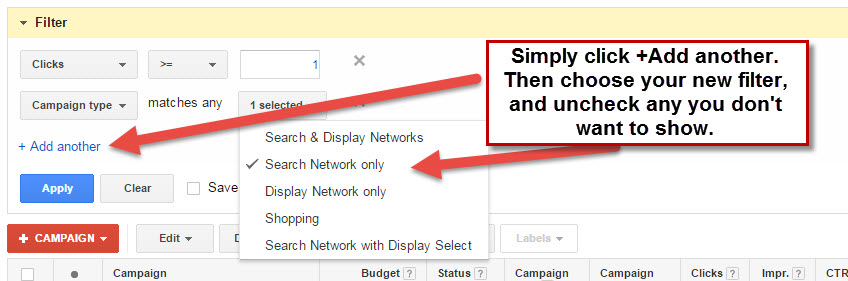
5. Now, I’d like to filter out all of my Shopping campaigns,
because I want to run this report just for my search campaigns. We can run a filter a variety of ways. You can filter by campaign name or by campaign type. Start by clicking +
Add another under the filter.
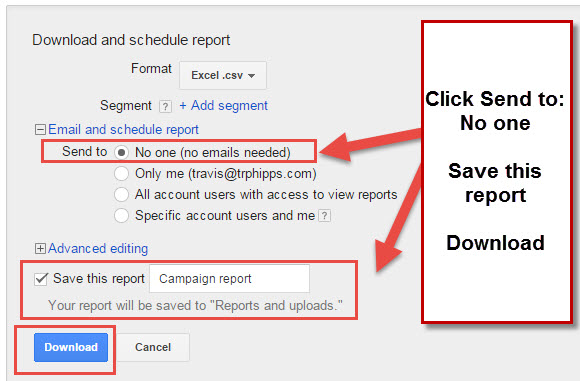
6. Now it is time to download our
report. Simply click on the download arrow, and then the “Download and schedule report” screen will pop up.
7. You can choose the format, then choose whether or not you want to email the report, or just download it one
time.
a. If you just want to download it once…choose the Send to “No one”,
then choose Save this report (or not), and click Download. You’re done. It will download directly through your browser.
8. If you want to schedule the report, you just have one more step.
a. You choose who you want it emailed to.
b. Then you choose the frequency.
i. One
time, Daily, First of Month, or Weekly (choose the day of week).
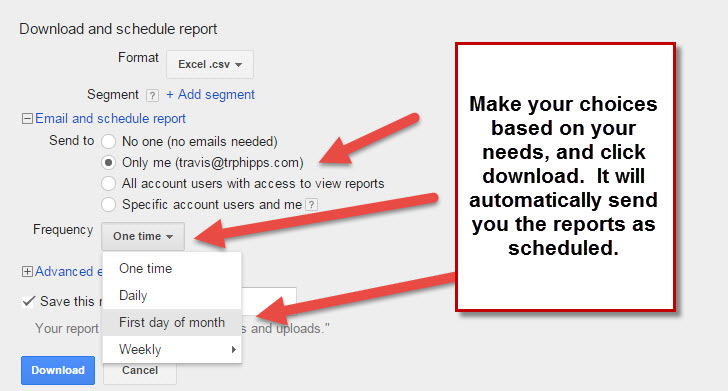
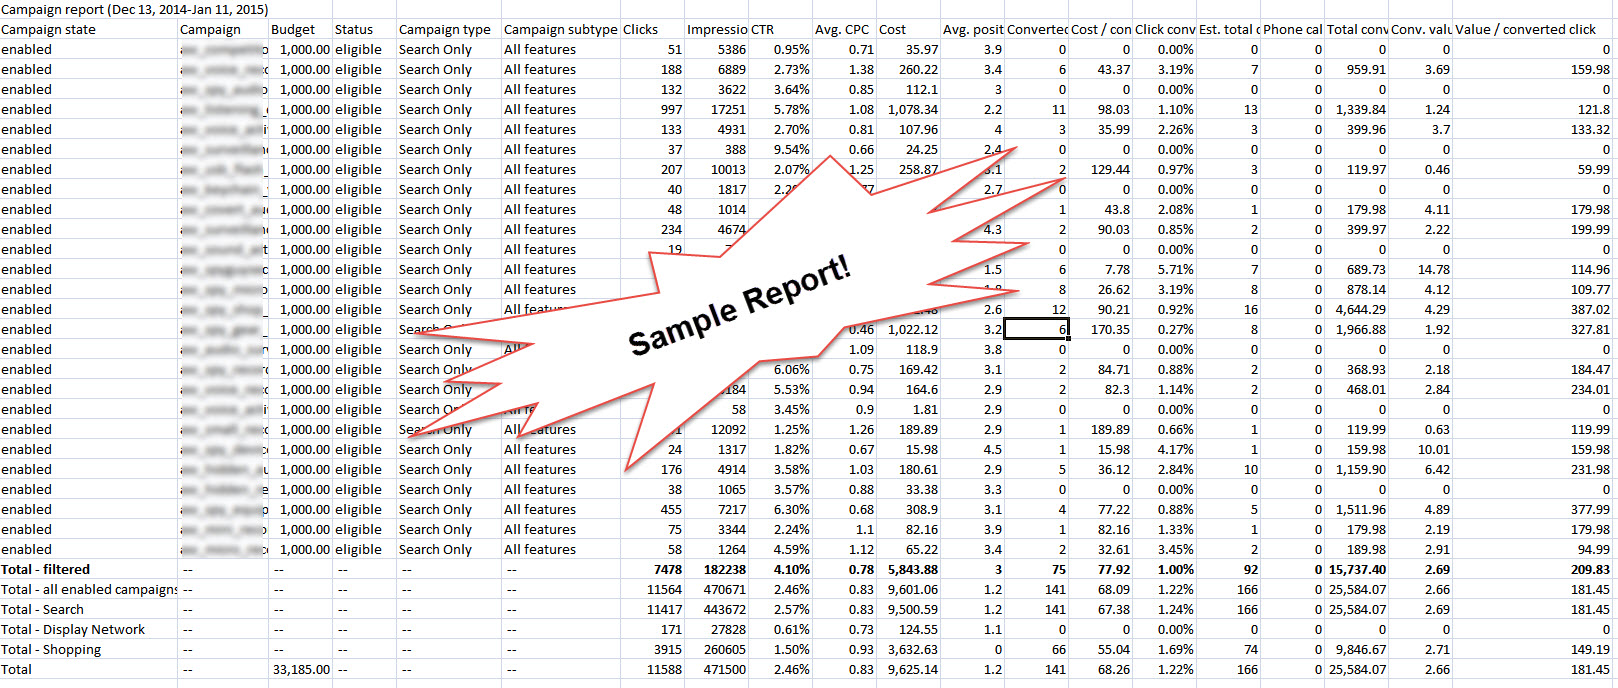
You can open your report in Excel,
Google Sheets, or your spreadsheet program of choice. Your downloaded report will look something like this:
If you are serious about your PPC campaigns and the overall health of your accounts, you will spend a lot of time running and analyzing reports. Now that you
know how to set one up, schedule one, and download it…you can run a report on almost anything imaginable. Just follow these simple steps:
1. Choose your columns
2. Filter your content
3. Download and
Schedule
That’s it. Let’s do a quick keyword report. We covered this in-depth in Module 3, but we were
running those reports for bid management and maintenance. This is just an example of what we can do with our reporting. You can run Ad reports (I think we’ll run one of those
too…just to see one in action!), Ad group reports, Ad extension reports, call tracking reports, etc, etc…I think you get the idea. If the data is being collected by AdWords,
you can run it! And it isn’t very difficult.
Ad Report
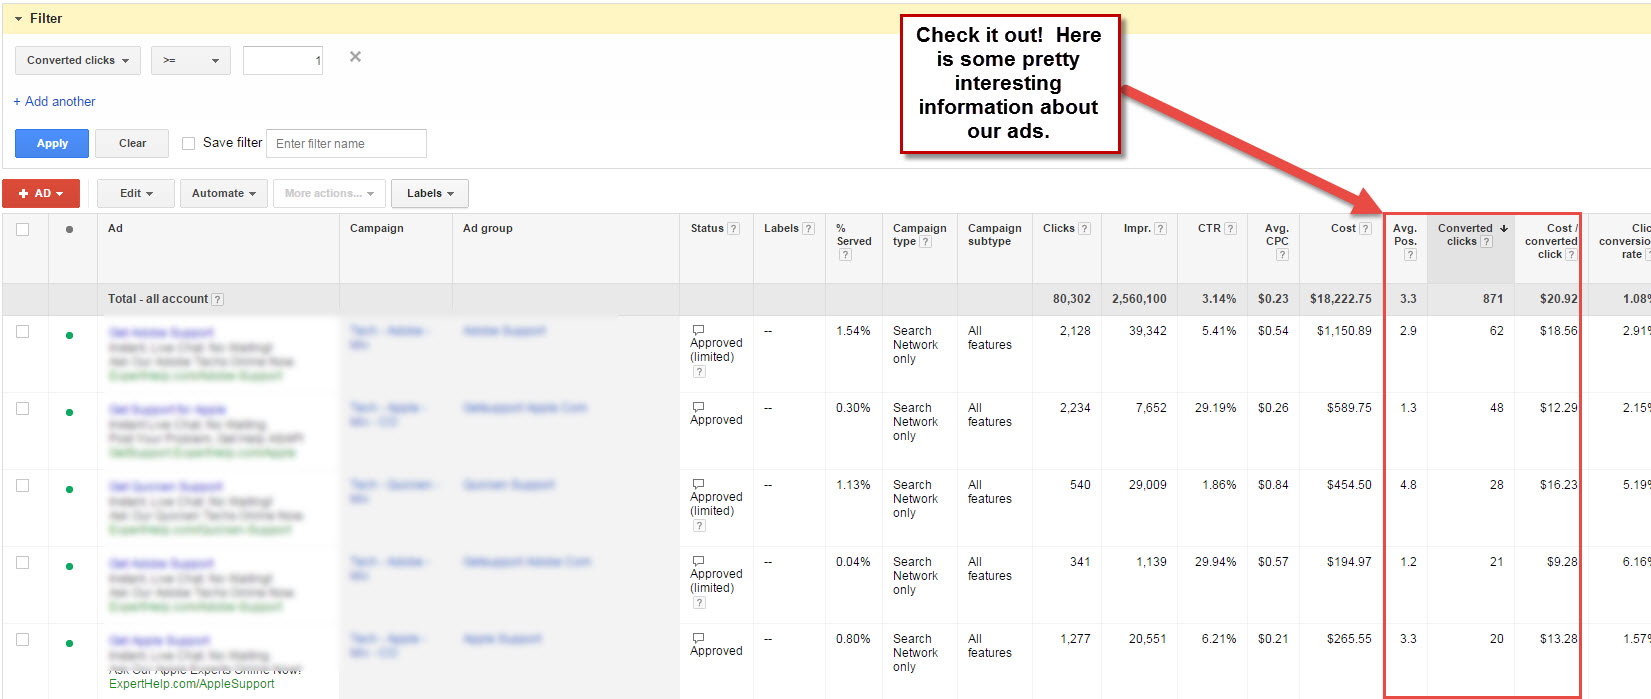
1. Click on the Ads tab.
2. Filter your ads by your desired criteria. I like to view Ad reports by converted clicks, so I create a filter with at least 1 converted
click.
3. Click the “download arrow” and repeat the steps from above.
Before you download the report, you can sort the data by any of your columns. If you sort by converted
clicks, you’ll be able to see the ad that converted the most across your entire account. Take this data with a grain of salt, because it may just be the Ad group, Campaign, or
Keyword that is producing the results…but it does give you an idea of which ad copy is working. You should analyze all of this data very carefully, and not jump to
conclusions…BUT you can take a peek and glean some nuggets of truth out of these quick views. I digress…back to the ad report.
Here is a sample Ad Report view:
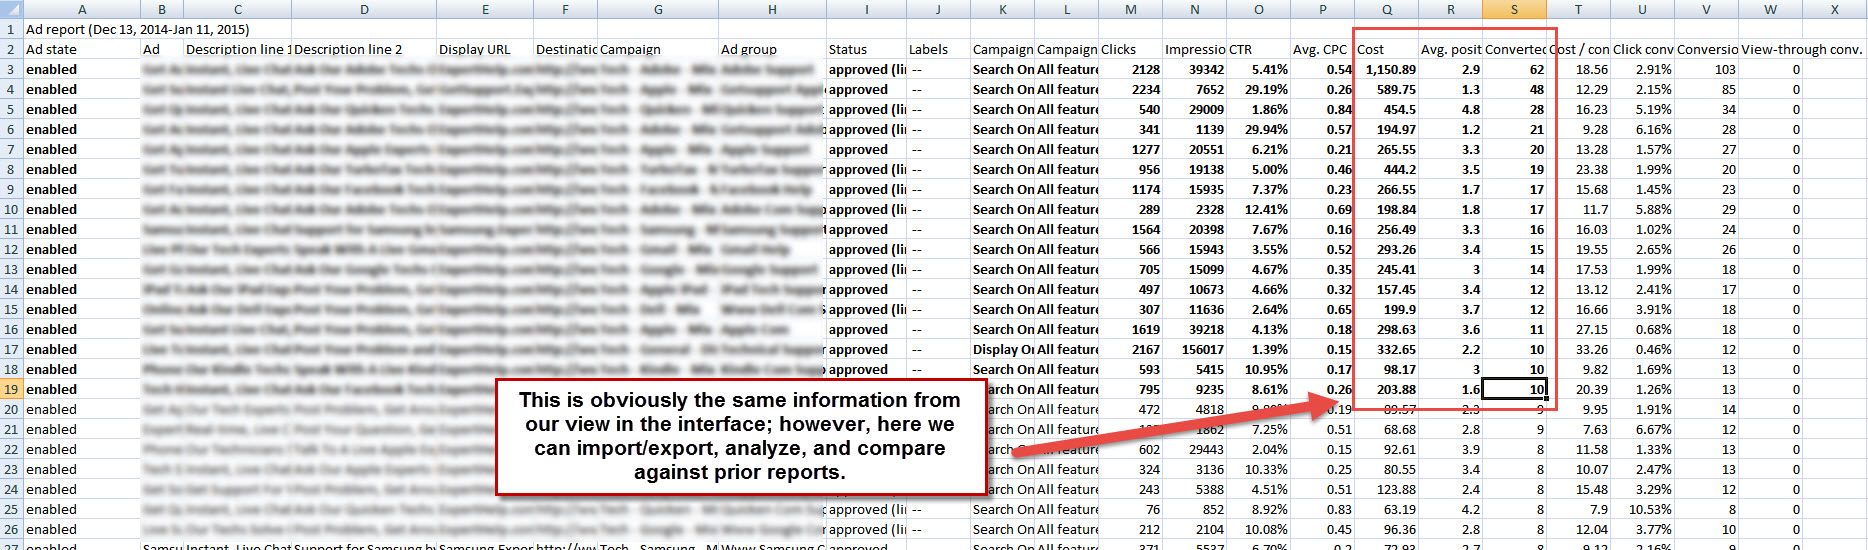
Here is the report
after we’ve downloaded it:
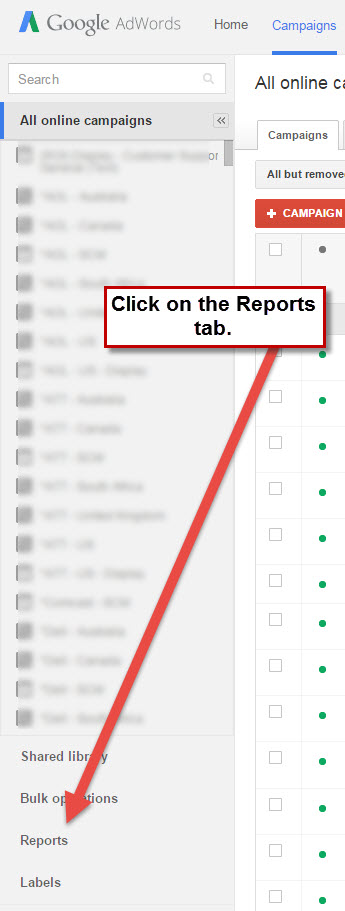
Running reports from the Reports Tab
You’ll see on the left hand
side of your AdWords web interface that there are several tabs at the bottom.
We’re interested in the Reports tab. Click on this tab, and it will take you
to all of your saved and scheduled reports.
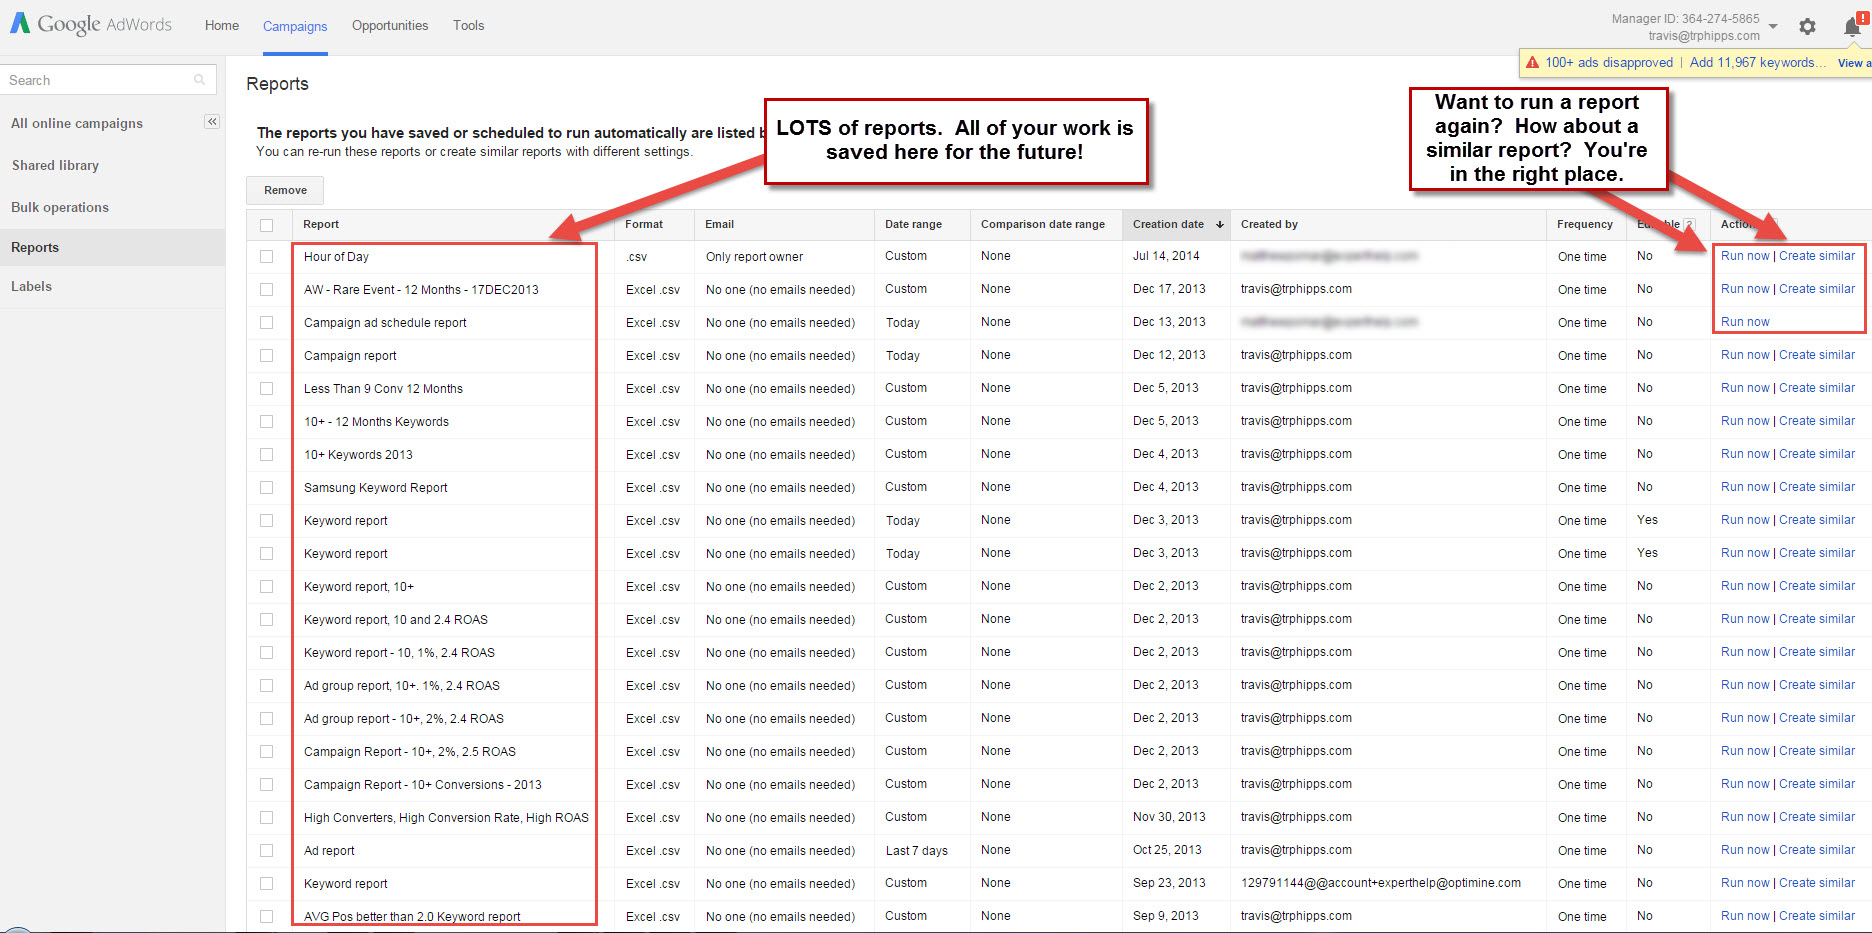
Now you’ll see a list of all the reports you’ve saved. You
can run the same report from this screen, or “create similar”. These come in very handy if you’ve slaved away at building out a report and you just need to make small changes
to it (like date range, add a column, etc, etc).
Here is what that screen looks like:
Running Reports Conclusions
As you can tell, I take
running and analyzing reports pretty seriously, and I highly suggest you do the same. I remember when I first got started with AdWords that running reports seemed a little
daunting, and definitely confusing. However, as you can see, it is super easy to run reports (even complicate reports with a lot of filters). There really is no reason at all
to run these as often as you need, and hand them out to your team. There is an old proverb, “What gets measured, gets managed”…and running reports frequently, comparing and
analyzing the data, and keeping this information on the top of the stack definitely helps you manage your AdWords account and the overall health of your online advertising
campaigns.
Create and save some reports and run them again next week…heck, run them tomorrow if you
feel like it!